Transaction Viewer 7.6
Overview
Screen Type: Workflow
Screen ID: WORKFLOW-191
The Transaction Viewer is the primary screen used in monitoring transaction data for various types of transactions in TMS. This screen uses an advanced Search Criteria modal screen that allows users to filter and search for specific transactions, including filters based on folio and transaction errors.
Users can select transaction records from the list view to view transaction details, including associated documents. Several procedures can be completed depending on the transaction, including Cancel and Cancel/Rebill operations, PQM error correction, NCL returns, and more. These operations are initiated from the 'Adjustments' tab of a transaction's Detail view.
This document is divide into two major sections:
-
A general overview of how to navigate the Transaction Viewer and read transaction Detail records.
-
Descriptions of procedures related to different operations available for adjusting transactions based on different scenarios.
Knowledge of the transaction workflow (bulk and non-bulk transactions) is prequesite knowledge that will not be covered in detail in this document. To learn more about the transaction workflow process, consult the Manual Transactions section of the TMS7 User Manual.
Screen Layout
To access the Transaction Viewer screen, complete the following:
-
On the TMS7 Home screen, search for 'Transaction Viewer' in the home screen search bar.
-
Select 'Transaction Viewer.'
-
Alternatively, a user can navigate to this screen using the Operations menu:
-
Select the Operations menu.
-
Select 'Transaction Viewer.'
-
![]()
The Transaction Viewer screen will display the 'Search Criteria' modal screen when first navigating to the screen. After defining search criteria, transactions that fit the search parameters will be displayed. You can use the 'Columns' feature in the 'Options' menu to hide and unhide columns of data you want to view after generating your transaction search. Additionally, you can export the transaction viewer results by selecting 'Export Transactions (XLSX).'
You can modify a search at any time using the 'Modify Search Button.' See Search Criteria and Filters for an overview of how the transaction viewer's search feature works, and see Transaction Details to understand how to read/interact with each transaction record that appears on the Transaction Viewer screen.
![]()
Note: Configurations are available to enable additional transaction information on this screen, including identification of transaction errors using color-coded rows. For more information on how to enable this configuration, see Transaction Details.
Search Criteria and Filters
The Search Criteria modal screen allows you to define specific parameters for locating transactions in the Transaction Viewer. There are two majors sections of the Search Criteria modal screen: the folio/error filters and the Advanced search criteria tab.
![]()
The top of the Search Criteria modal screen features fields that allow a user to search for transactions based on saved custom filters, folio information, or transaction error type.
![]()
The drop-down menus and multi-select lists are defined in the table below:
| Field | Definition |
|---|---|
| Filter |
The filter feature allows you to add filter templates to make viewing transactions with specific search patterns easier in the future. After creating your search pattern, you can save the search pattern as a filter which will appear in the Filter drop-down menu. To add a new filter, enter a name in the search field and then select '+Add'. After you fill out the search criteria fields with a search pattern as described in the previous section and select 'Search,' the filter will be saved with the parameters defined in each field. This filter will now appear on the Filter field drop-down menu. |
| Share |
The Share field defines whether a newly defined filter will be available to all TMS7 users or only available to the specific user who created the filter. By default, the Share field is always marked 'No.' Additionally, only users with permission to use the Execute features for this screen in TMS7 will be able to save filters using the Share filter; these permissions are configured via the Groups screen. If 'Yes' is selected and the filter is saved, the filter will appear in the Filter drop-down menu for all TMS7 users. If 'No' is selected and the filter is saved, the filter will only appear in the Filter drop-down menu for the user who created the filter. |
| Result Limit |
The Result Limit is a drop-down menu for selecting a limit to the amount of transactions that will appear in a search. The lowest limit is 50 results, and the highest limit is 10,000 results. |
| Include Memos | |
| Folio Year | This field allows you to search for all transactions in a specific year. |
| Folio Month | This field allows you to search for all transactions in a specific folio month (must select Folio Year first). |
| Folio Number | This field allows you to search for all transactions in a specific folio number (must select Folio Year and Month first). |
| Show Only |
This is a multi-select field that allows you to filter the transaction viewer by error types. You can select as many types as desired from this list. Options currently include:
|
Advanced Search Criteria
The Advanced search criteria allows you to define search rules for transactions. You can link together several search rules by using the '+Add rule' button, and then linking the rules using the 'AND,' 'OR,' and 'NOT' options.
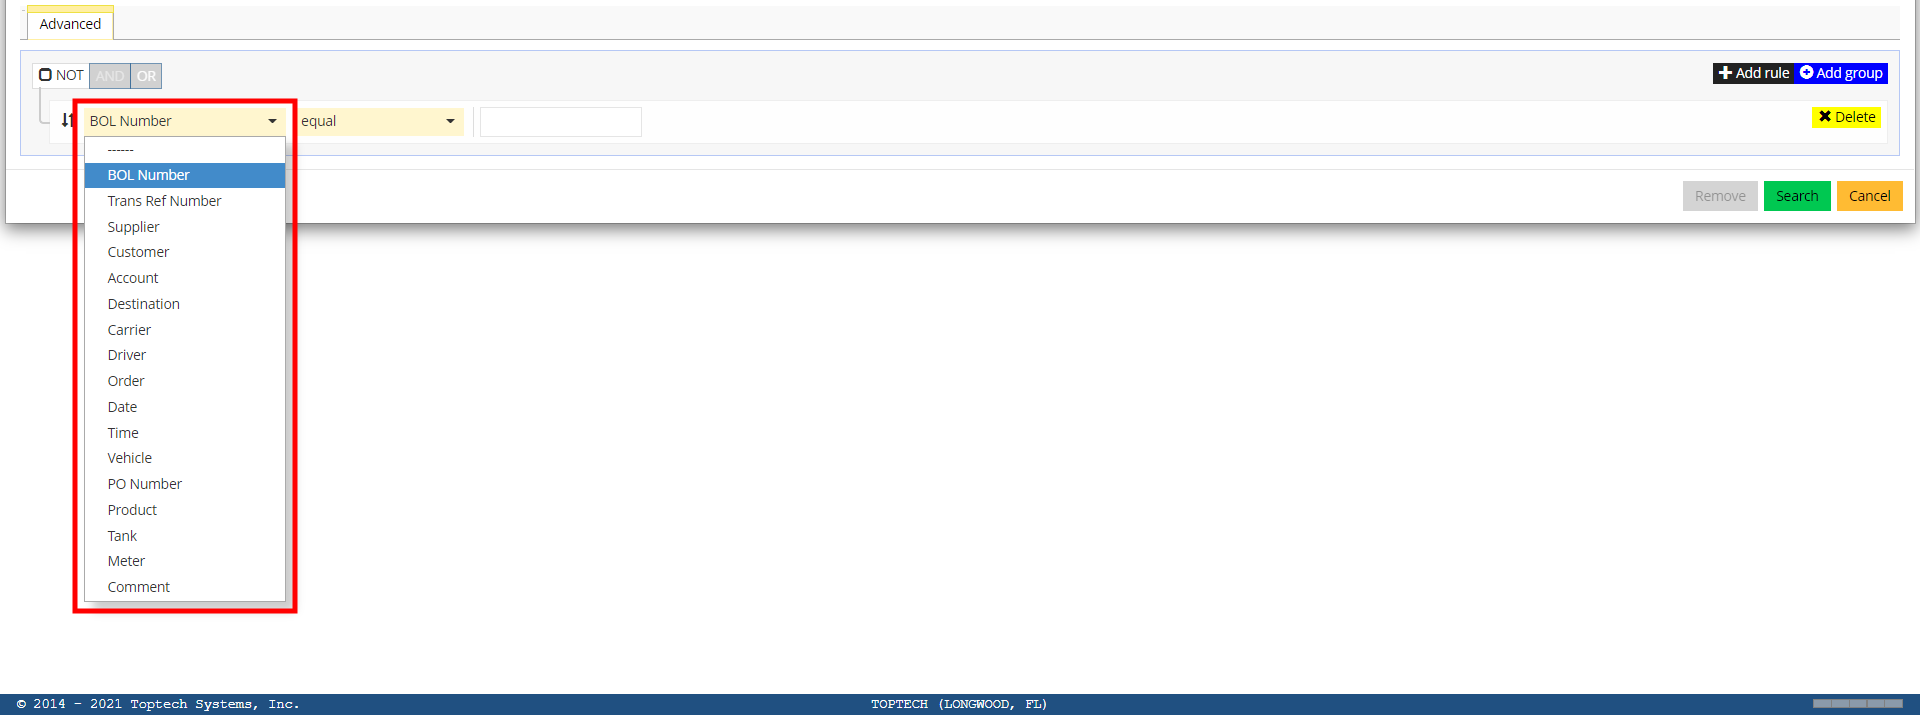
To begin defining a search pattern, select your first Search topic from the drop-down menu. The possible search topics can be viewed in the image below, and include options such as BOL Number, Supplier, and Product.
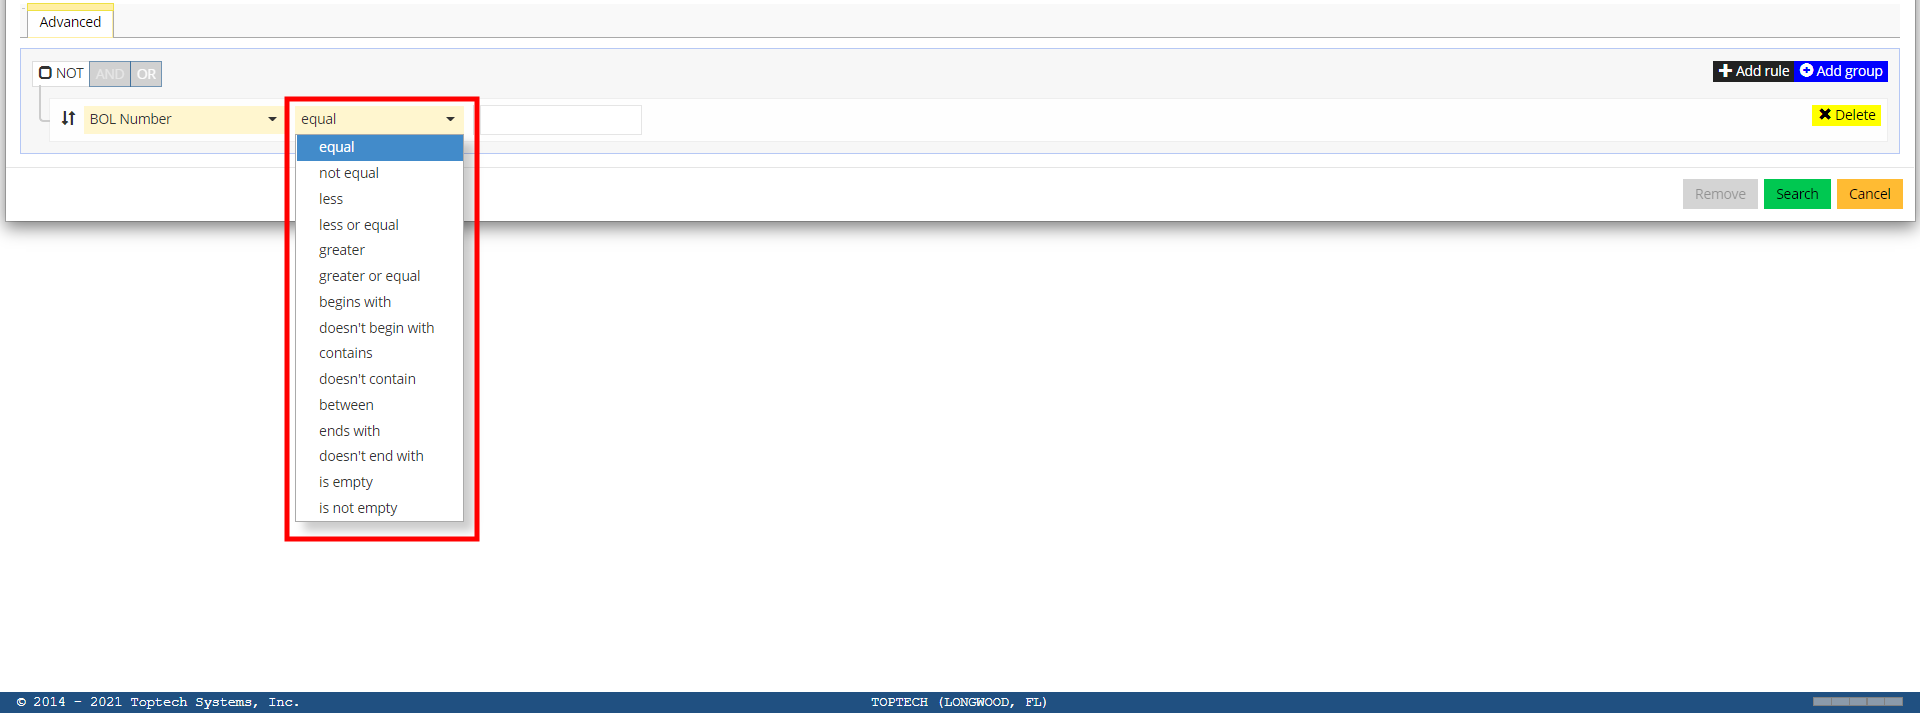
Next, select the formula for the search pattern. This will determine what kind of data TMS7 will search for based on your search pattern topic and the value you will define in your next step. For example, you could select 'Date' as your search topic and select 'greater or equal' as your search formula; after you specify the date in the search value field, the transaction viewer will pull all transactions that are greater than or equal to the date (or in other words, that occurred on or after that date). The search formula options can be viewed in the image below, and include options such as 'equal,' 'begins with,' and 'between.'
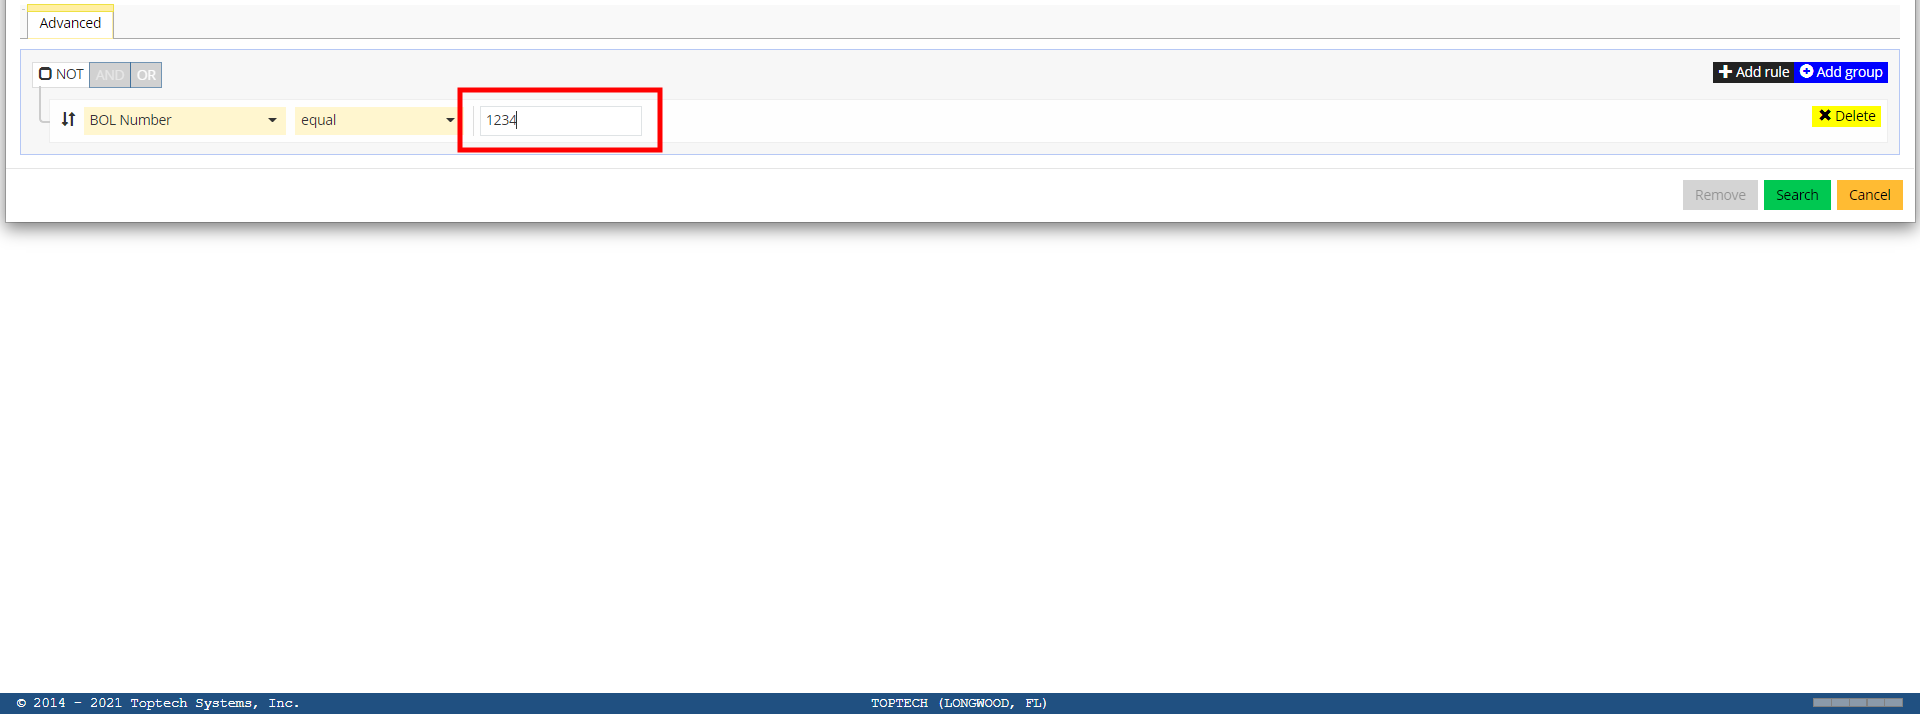
Next, enter a search value to complete your search pattern. Depending on what search topic you select, this field may be a free-form text box, or it may be a drop-down menu. For example, selecting BOL Number as your search topic will mean that your search value field will be a text box where you enter a number; selecting 'Time' as your search topic will mean that your search value field is a drop-down menu that lists times you can select.
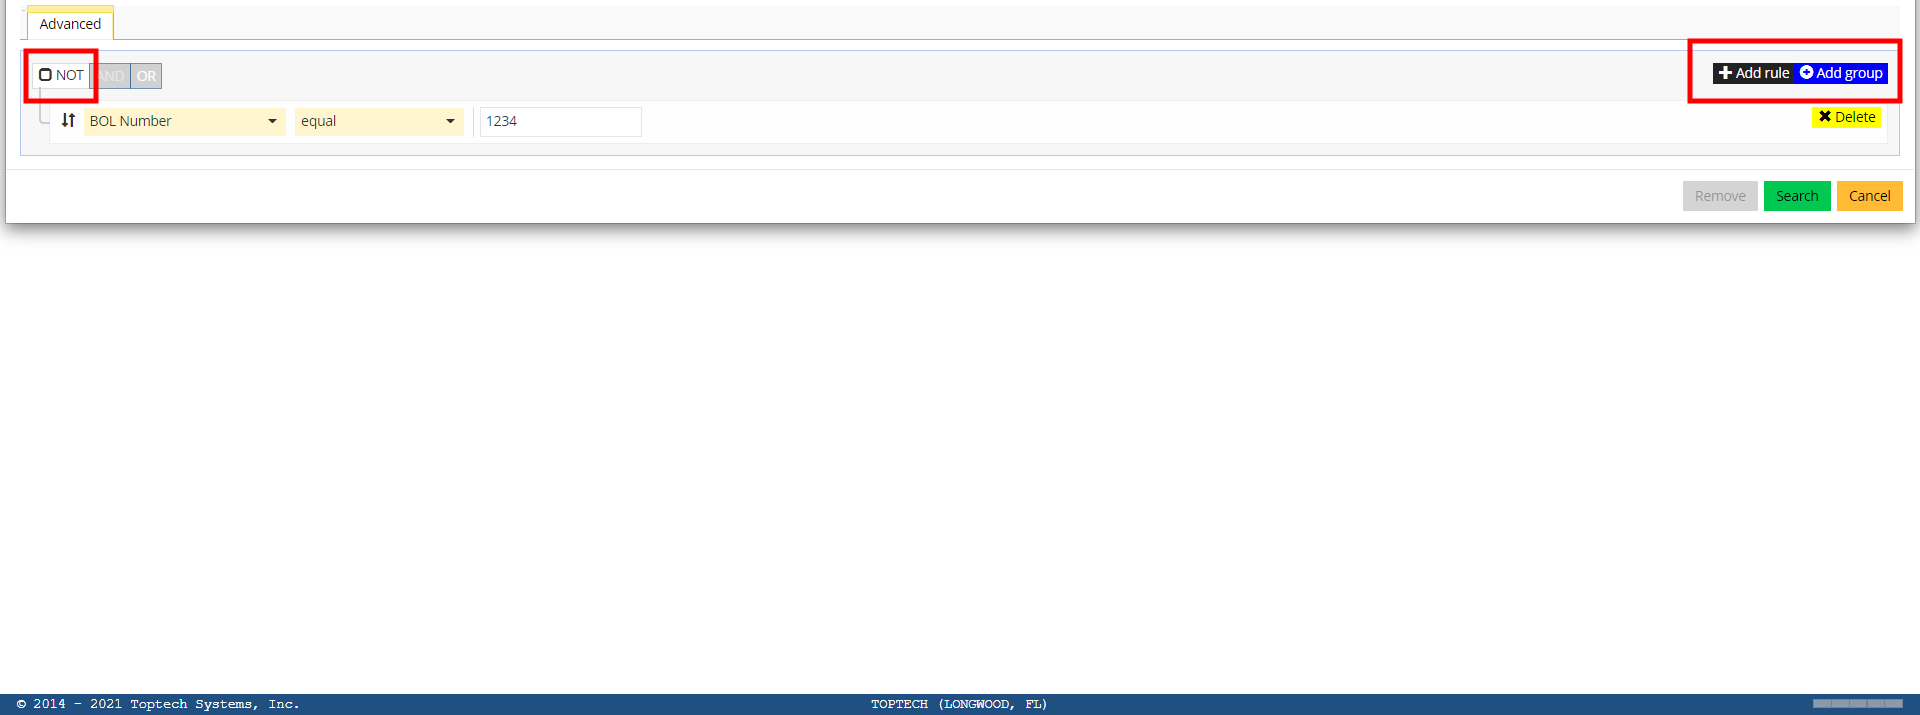
After defining these three search pattern fields, you could select 'Search' and the transaction viewer would display all transactions that meet that basic search criteria. Also note that you could select the 'NOT' checkmark, and the results will instead be all transactions that do not meet the defined search parameters.
If you would like a search pattern with more complex/detailed search rules, you can use the '+Add rule' and '+Add group' features to create a more complex search pattern.
If you want to add a second search rule, select '+Add rule.' This will add a second search line identical to the first search line where you can select a search topic, formula, and value.
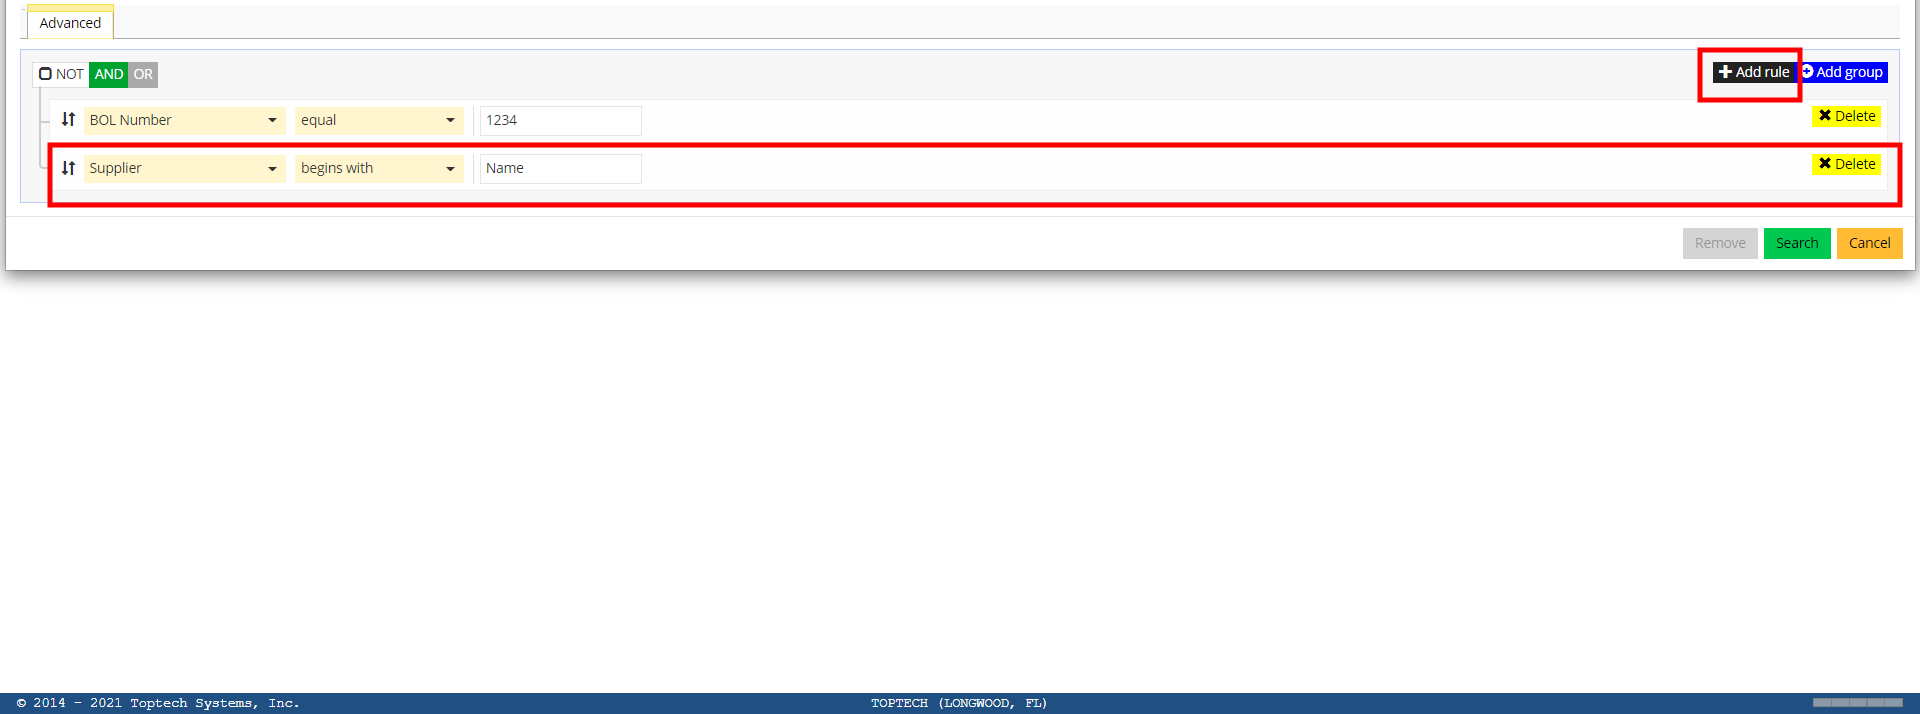
When you add a second rule, notice that you must either select 'AND' or 'OR' (the default is 'AND'). Selecting 'AND' means TMS7 will search for transactions that match the first search rule AND the second search rule (or as many rules are defined); only a transaction that satisfies all the search rules will appear in the Transaction Viewer. For example, in the image above only transactions with a BOL number equal to '1234' and with a Supplier that begins with 'Name' would be included in the Transaction Viewer report.
Selecting 'OR' means TMS7 will search for any transactions that match at least one of the search rules; transactions do not have to satisfy every defined rule to appear in the Transaction Viewer, only 1 of the defined rules. For example, in the image above transactions with a BOL number equal to '1234' or transactions with a Supplier that begins with 'Name' would be included in the Transaction Viewer report.
You can rearrange the order of rules by selecting the up and down arrow icon and dragging and dropping the rules into place.
Rules can be deleted by selecting the yellow 'xDelete' button.

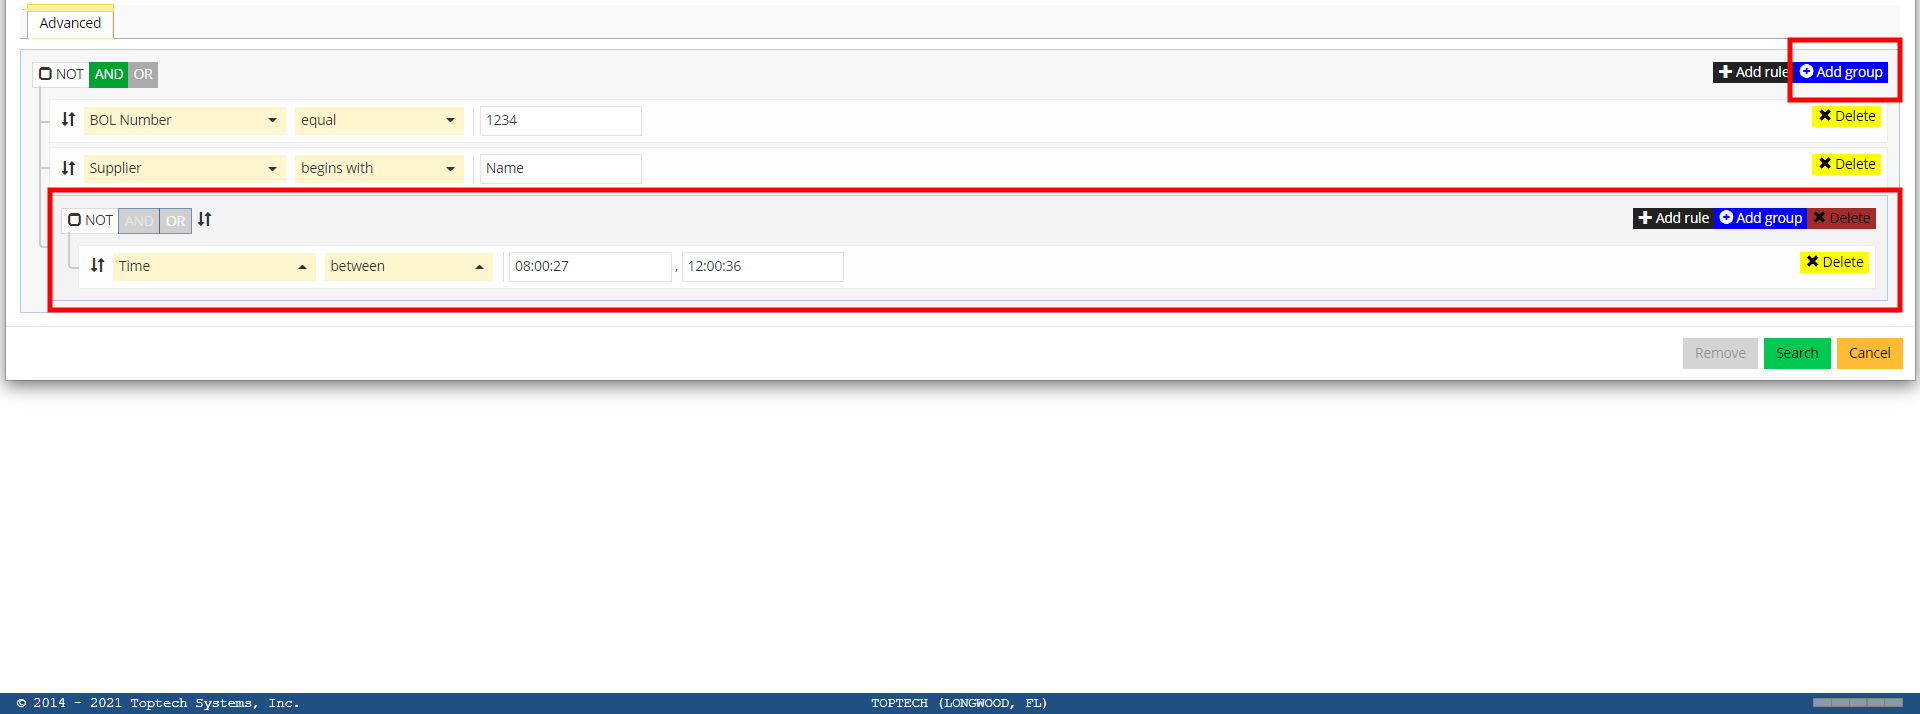
You can also add additional search groups to create additional 'AND/OR' search pattern relationships. Your first set of rules are considered your first search group. Selecting '+Add group' will add a search group with features identical to the first search group, which will begin with 1 search rule.
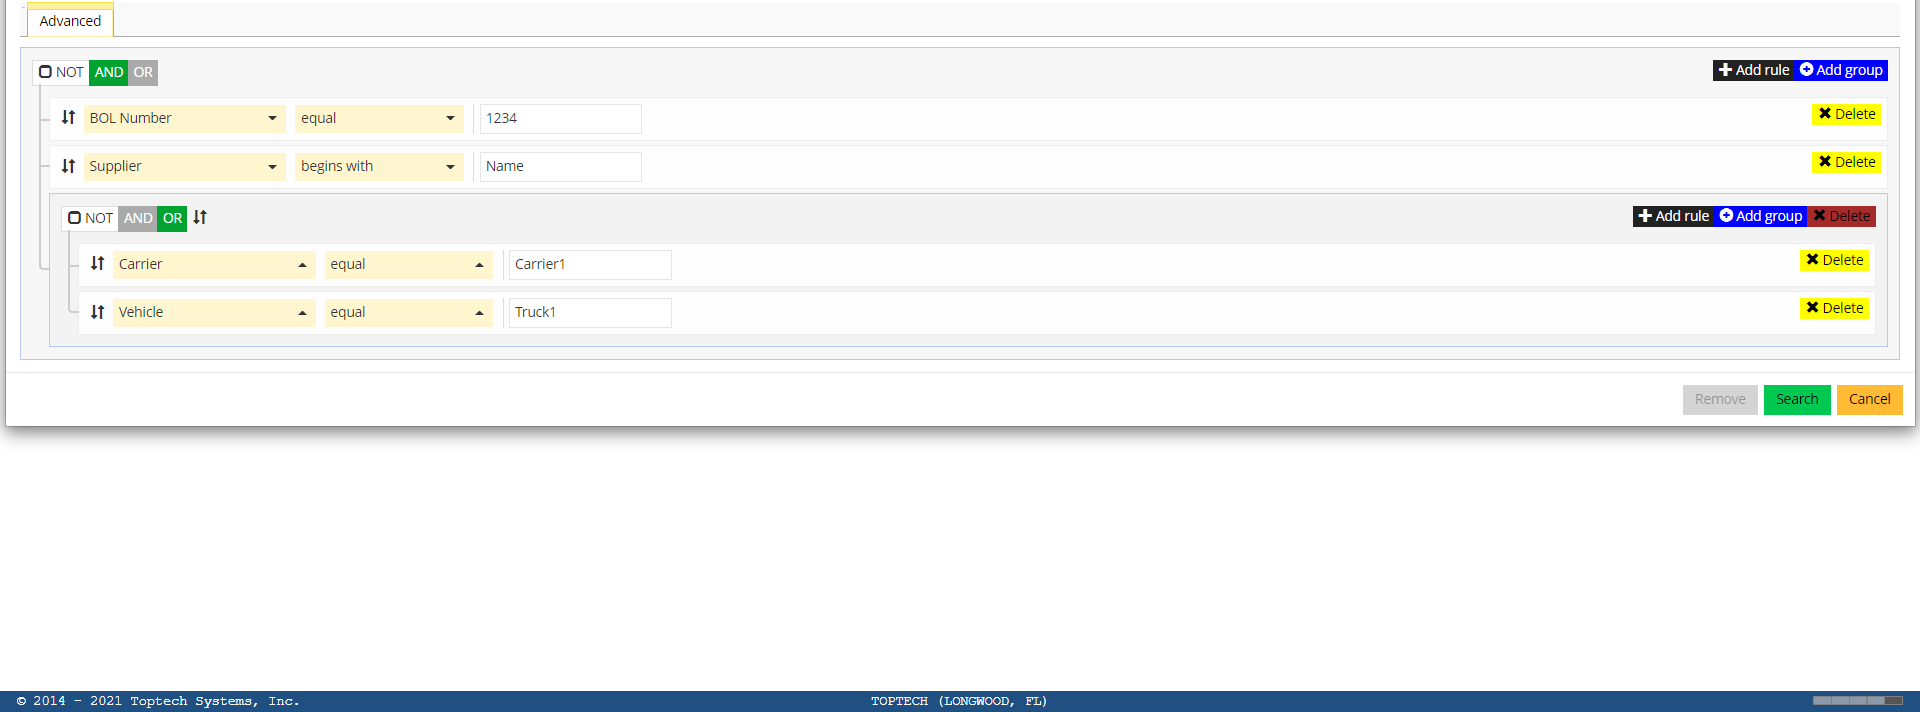
You can create several groups and sub-groups to create different levels of complexity in your search pattern. Groups must be used if you want to create search patterns that contain both AND and OR rules. In the example below, the search pattern uses a sub-group that searches for transactions that meet the criteria of [BOL Number] AND [Supplier] AND [Carrier OR Vehicle]; in other words, the transactions that appear based on that search pattern will be any transaction that has that BOL Number, Supplier, and either the Carrier or Vehicle.
Search Criteria - Using Filters
Filter menu
The filter feature allows you to add filter templates to make viewing transactions with specific search patterns easier in the future. After creating your search pattern, you can save the search pattern as a filter which will appear in the Filter drop-down menu.
To add a new filter, enter a name in the search field and then select '+Add'. After you fill out the search criteria fields with a search pattern as described in the previous section and select 'Search,' the filter will be saved with the parameters defined in each field. This filter will now appear on the Filter field drop-down menu.
Note: By default, filters will only be saved for that specific user; other users on TMS7 won't see the filter option in the Filter drop-down menu if they view this screen. If you want to save a filter that can be selected by any TMS7 user with the appropriate permissions, you will need to use the 'Share' field. Users must have Execute permissions enabled for this screen in order to use the Share Field.
Transaction Details
Transaction List View
After completing a search, the Transaction Viewer will present a list view of all transactions that meet the search parameters.
![]()
If the "Additional Transaction Information" screen argument is enabled ("Yes") via the Screen Configuration workflow, transactions with errors will be highlighted in colors that correspond to the key at the top of the transaction viewer.
![]()
You can filter for these specific error types using the "Show Only" field in the Search Criteria modal.
![]()
You can select any transaction record to open the Transaction: Detail record for that specific transaction, which will include the transaction details, documents, and make modifications to transactions via the Adjustments feature.
![]()
The type of Adjustments that can be performed will depend on the transaction and any transaction error statuses. These different adjustment procedures will be described in detail in the Procedures section. The BOL number will be displayed at the top of the transaction, and the record will be divided into three tabs defined in the sections below.
Detail Tab
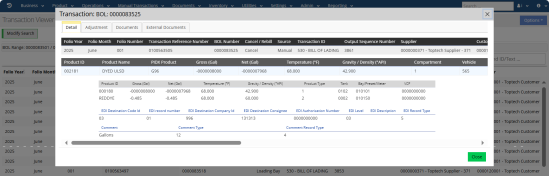
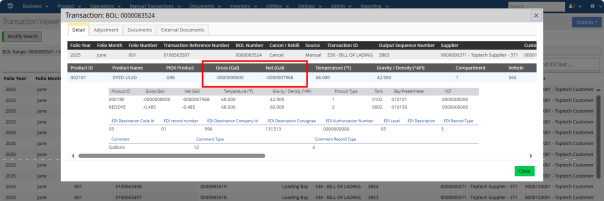
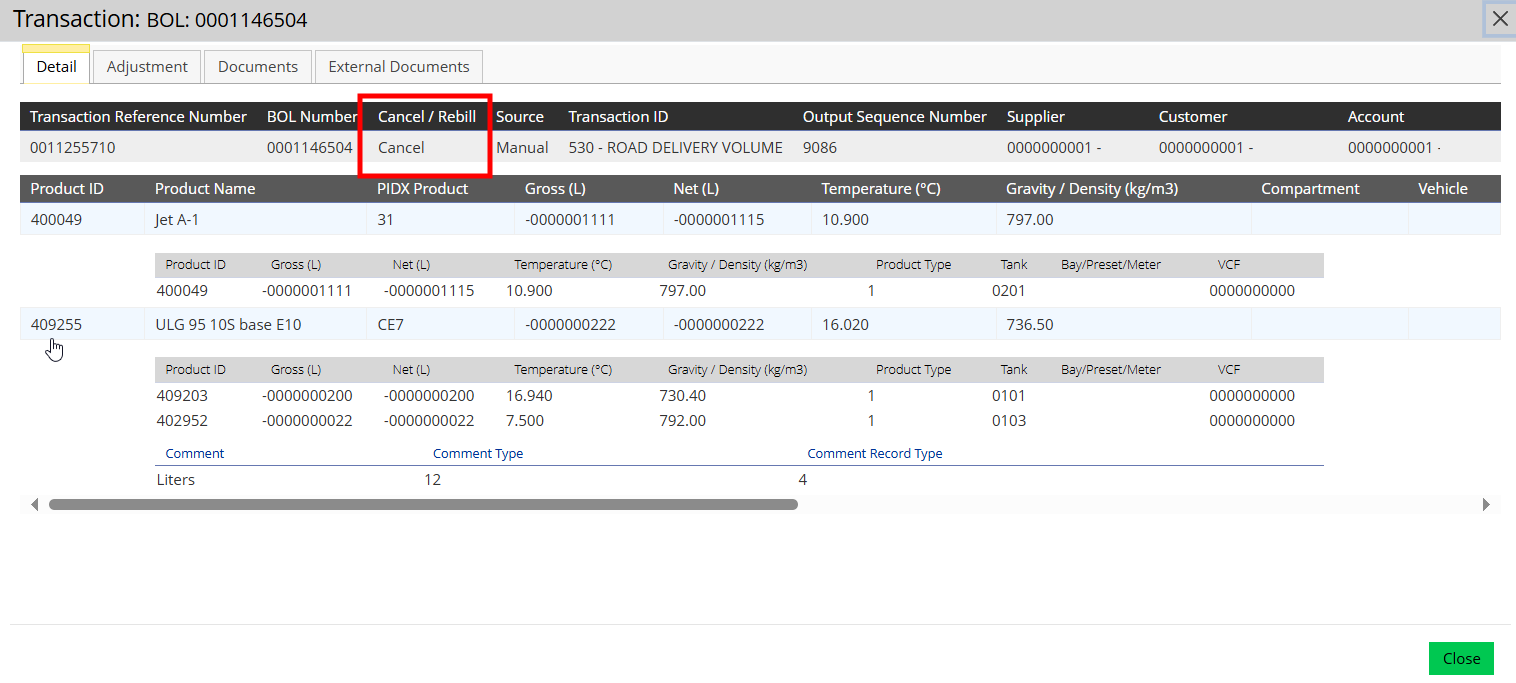
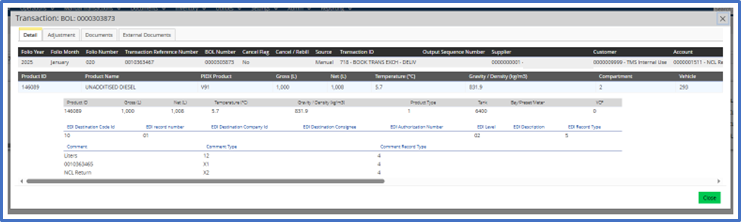
The Detail tab displays all information relevant to a transaction. Refer to the screenshot and table below for general descriptions of each part of the Detail view of transaction information.
![]()
| Section | Description |
|---|---|
| 1. Transaction Folio and SCAD Information | This section displays information related to specific trandsation identifiers (transaction reference number, transaction ID, supplier, customer, etc.) |
| 2. Saleable Product Information | This section displays the saleable product used in the transaction and its gross/net volume, temperature, and gravity/density, as well as the vehicle used in loading. |
| 3. Product Component Information | This section shows the component products used in the transaction to create the saleable product. |
| 4. EDI Information | This section displays information related to EDI. |
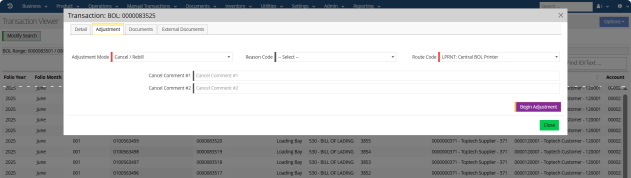
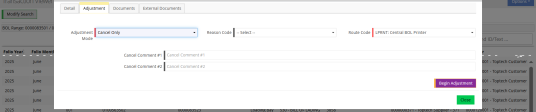
Adjustment Tab
Any type of change to a system transaction is a modification, also known as an adjustment. In most cases, modifying information can be done as a Cancel or a Cancel/Rebill. The user has the option to just cancel or delete a transaction (Cancel Only), or to cancel it first and then rebill it as a new transaction after editing the details of the original transaction (Cancel/Rebill).
![]()
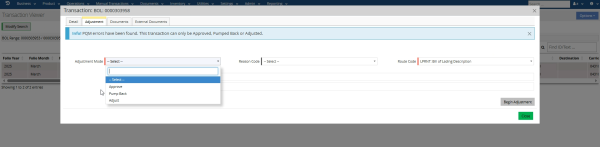
In the case that there is some kind of transaction error, a warning banner will appear at the top of the transaction. The "Adjustment Mode" you will be able to select in these scenarios will be dependent on the error type. Adjustments for these different scenarios will be described in the Procedures section.
The fields in the Adjustment tab are described in the table below:
| Field | Description |
|---|---|
| Adjustment Mode | This field determines the type of adjustment that can be made depending on the transaction and any potential error states the transaction is in. These different modes and scenarios will be covered in the rest of this document. |
| Reason Code | The reason code can be used to assign a specific code indicating the general reason why the transaction is being adjusted. |
| Route Code | The Route Code determines where the new transaction data will be routed. |
| Cancel Comment # 1 and #2 | These text boxes can be used to add additional comments related to the adjusted transaction. These comments will appear in the cancel/rebill transactions after the adjustment is processed. |
| Begin Adjustment button | Clicking this button will start the adjustment process. An Adjustment Mode and a Route Code must be selected before this button is enabled. |
| Close | This button will close the transaction detail view. |
Documents Tab
The Documents tab provides a PDF viewer which displays the BOL for that transaction. The PDF viewer contains several tools, such as a highlight feature, save feature, print feature, and more. You can also select a Regeneration Route Code and select 'Regenerate' in order to reprint the BOL with any data that may have been updated if there was a data-entry error that was corrected after the transaction was completed.
![]()
External Documents Tab
The External Documents tab allows users to attach additional documentation (must be in a a PDF format) to a transaction. The top of the screen features a drag-and-drop upload area and below that is a list of all documents that have been attached to that transaction record.
![]()
You can drag and drop or upload PDFs. A status bar will indicate if an upload has been completed.
![]()
Once a document is uploaded, it will appear under the Document Name column as a smart-link; clicking this link will open the document. You can add comments to the document using the Comment box. To remove a document, you can select the 'X' on the right-hand side of the table.
![]()
Procedures
The following sections will describe how to perform adjustments on different types of transactions. When applicable, this document will identify any additional configurations that are needed in order to use different features of the Transaction Viewer. These procedures reflect general processes using the Transaction Viewer and may not reflect every possible transaction adjustment/correction scenario.
The screen layouts for the manual transaction workflow screens will not be covered in detail in this document. Consult the TMS7 User Manual for more detailed descriptions of these workflow screen layouts.
Cancel/Rebill
Any type of change to a system transaction is a modification, also known as an adjustment. Modifying information for transactions (free of any transaction errors) can be done as a Cancel or a Cancel/Rebill. The Cancel/Rebill option allows a user to edit the information of an existing transaction and rebill it as a new modified transaction, which will also create a Cancel transaction in order to negate the original transaction.
To perform a Cancel/Rebill on a transaction, complete the following:
-
Navigate to the Transaction Viewer and enter search criteria to locate your desired transaction.
-
Select the transaction from the list view.
-
Select the Adjustment tab.
-
In the Adjustment Mode field, select Cancel / Rebill. You can also specify a reason code and add any comments related to why the cancel/rebill is being performed using the other fields in the Adjustment tab.
-
Click 'Begin Adjustment.'
-
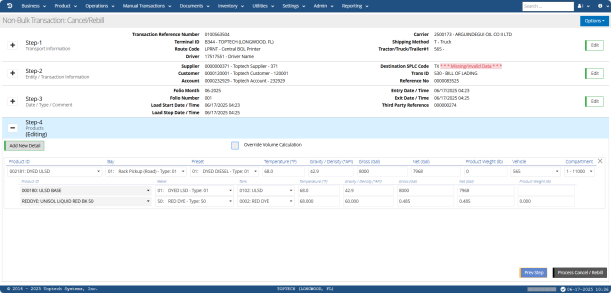
You will be brought to the Non-Bulk Manual Transaction Cancel/Rebill screen. This screen is identical to the 4-step Non-Bulk Manual Transaction Workflow screen. See Non-Bulk Manual Transaction for descriptions of each step and the data fields in each step.
-
Edit and/or correct any of the erroneous data/information using the 4 steps.
-
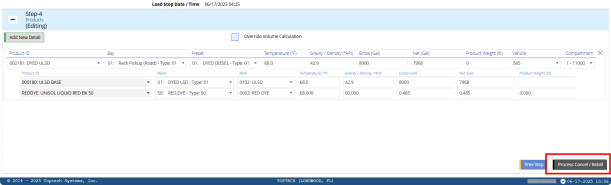
In Step-4, click the Process/Cancel Rebill button.
-
A Transaction Summary will be displayed which shows the Total Net Quantity of the transaction.

-
Click 'Ok.'
-
You will be prompted to start a New Transaction or to return to the Transaction Viewer; you must select one option to continue.

-
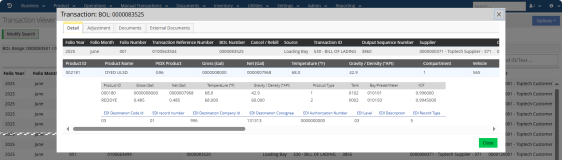
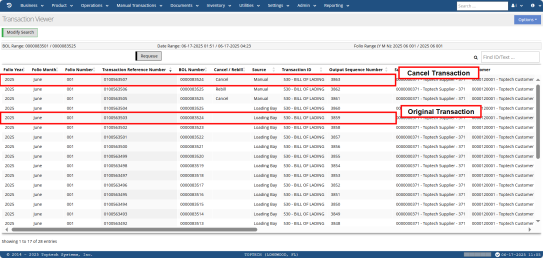
After you have confirmed your option choice, the transaction will appear in the Transaction Viewer. There will now be a Cancel Transaction and a Rebill Transaction with the same BOL number as the original transaction.

-
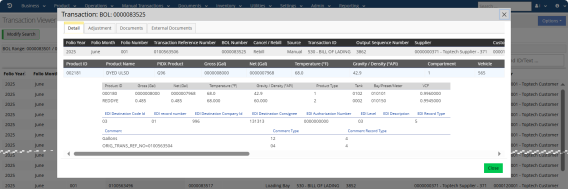
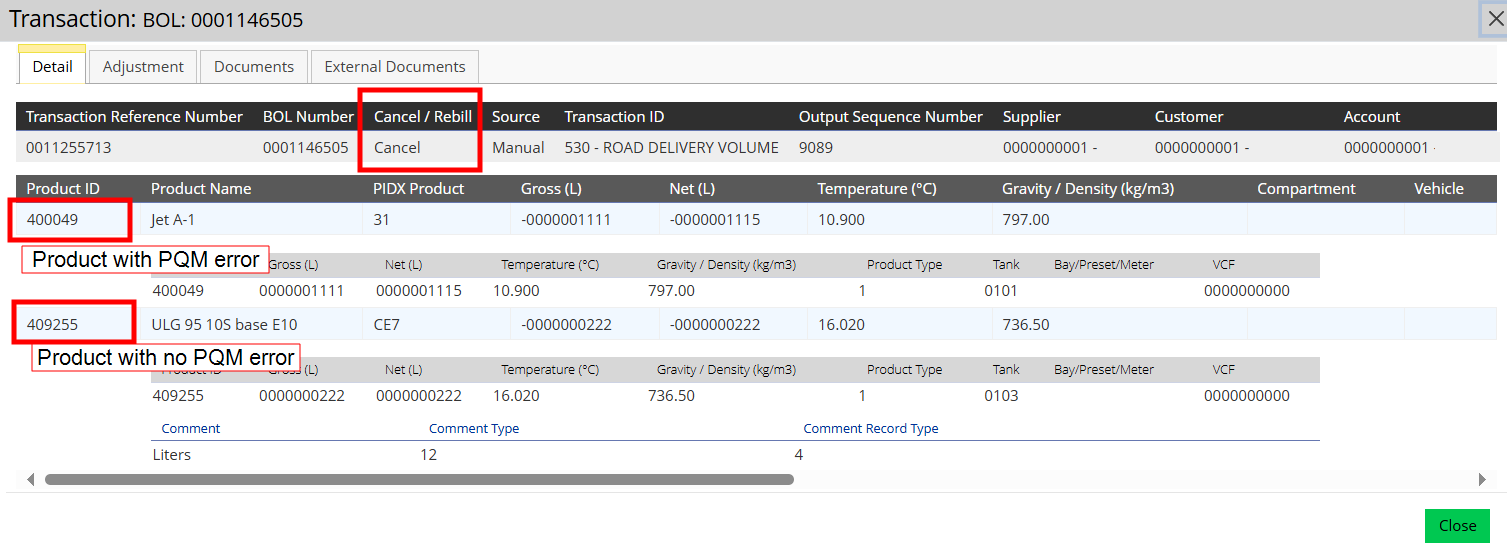
You can select these transactions to view the transaction data. Note that the Cancel transaction will have a negative gross and net value. The transaction detail for the original, cancel, and rebill transactions are shown below.
Original:
Cancel:
Rebill:
Cancel Only
The Cancel Only option allows users to create a cancel transaction which will contain negative gross/net volumes that negates or "cancels out" the original transaction gross/net volumes. The process works similarly to the Cancel/Rebill process, except that no data can be edited on the Non-Bulk transaction: Cancel screen since the cancel transaction is only cancelling the original and not rebilling it with new transaction data.
To begin a Cancel Only transaction, complete the following:
-
Navigate to the Transaction Viewer and enter search criteria to locate your desired transaction.
-
Select the transaction from the list view.
-
Select the Adjustment tab.
-
In the Adjustment Mode field, select Cancel Only. You can also specify a reason code and add any comments related to why the cancel is being performed using the other fields in the Adjustment tab.
-
Click 'Begin Adjustment.'
-
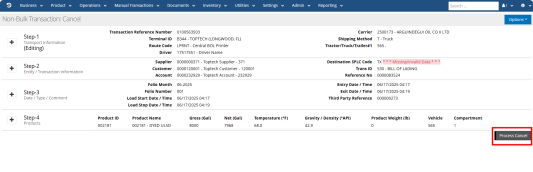
You will be brought to the Non-Bulk Manual Transaction: Cancel screen. Since this is a Cancel Only transaction, no information can be adjusted.
-
Click 'Process Cancel.'
-
A Transaction Summary will be displayed which shows the Total Net Quantity of the transaction.

-
Click 'OK.'
-
You will be prompted to start a New Transaction or to return to the Transaction Viewer; you must select one option to continue.

-
After you have confirmed your option choice, the transaction will appear in the Transaction Viewer. There will now be a Cancel Transaction with the same BOL number as the original transaction.
-
You can select these transactions to view the transaction data. Note that the Cancel transaction will have a negative gross and net value. The transaction detail for the original, cancel, and rebill transactions are shown below.
Original:
![]()
Cancel:
Requeue
The Requeue feature allows users to requeue transactions for communication to a host system. The Requeue features functions as a batch select process, allowing you to select multiple transactions and then specify the requeue route code using the Requeue Transaction modal screen.
To begin requeing transactions, you would first click the Requeue button on the Transaction Viewer screen.
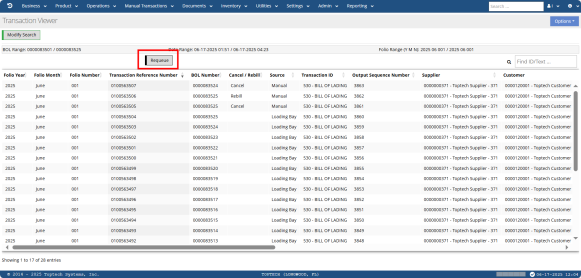
This will set the transaction Viewer into the Requeue select mode.
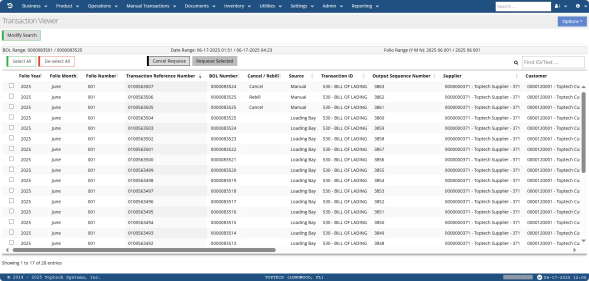
You can select individual transaction records by checking the checkbox to the left of each record. You can also use the Select All and De-select All buttons to select/unselect all transactions.
After you have selected at least one transaction, the 'Requeue Selected' button will be enabled.
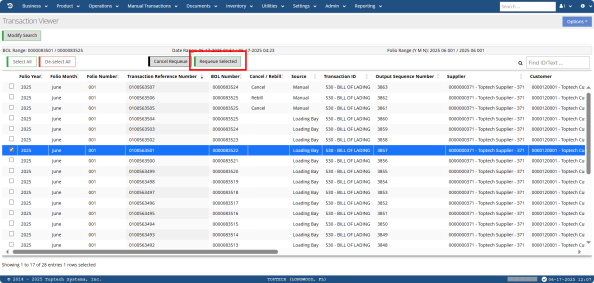
Clicking 'Requeu Selected' will open the Requeue Transaction modal screen.

The screen will display the BOL number(s), Transaction Reference Number(s), Cancel Flag(s) (indicating if it is a transaction that was cancelled), and the EDI Transmission Status(es) for all selected transactions.
In order to enable the 'Process' button, you must select at least one of the Send Requeue checkboxes AND select a Requeue Route Code from the drop-down menu for the selected transaction. The Route Code is the EDI code that will determine where the transaction data will be sent. After selecting a transaction and choosing a route code, the 'Process' button will be enabled.
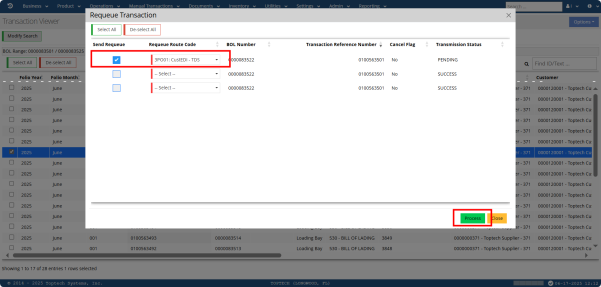
Clicking 'Process' will then requeue and send the transaction to the specified route. You can monitor the status of the transmission by viewing the transaction on the Queue Manager screen (WORKFLOW-079).
PQM Error Correction
Beginning in TMS 7.6.3, the Transaction Viewer is used to manage PQM Error Corrections. Product Quality Monitoring (PQM) refers to TMS's validation of product loads to ensure they meet specified product quality standards.
This section will only cover the PQM Error Correction processes related to the Transaction Viewer. For a full overview of TMS7's PQM functionality, consult the Product Quality Monitoring User Guide.
There are three adjustment options users have when dealing with PQM Error Correction for transactions:
-
Approve
-
Adjust
-
Pump Back
The Pump Back option can also be configured as a Transmix Pump Back. A normal Pump Back creates cancel and rebill transactions to return products to their original tanks, whereas a Transmix Pump Back returns products to one single Transmix Tank. The Transmix Pump Back functionality will be covered as a subsection of the Pump Back section.
Required Screen Arguments and Configurations
Transaction Viewer (WORKFLOW-191)
The following screen arguments should be enabled via Screen Configuration for the Transaction Viewer:
-
"Additional transaction Information" should be set to "Yes."
-
Optional: If you do not want "Adjust" to be an option for PQM error correction, you can set "Hide PQM Adjust" to "Yes" which will remove the Adjust option from the Adjustment Mode drop-down menu.
Groups
Ensure group permissions are enabled for the PQM Error Correction - Pump back screen (WORKFLOW-215)
![]()
Approve
The Approve option allows a user to cancel/rebill a transaction without making any adjustments to the transaction data, overriding the PQM Error state. To process the PQM Transaction Correction using the 'Approve' option, complete the following:
-
Navigate to the Transaction Viewer and filter for PQM Errors using the Quick Filters field.
-
Select the desired transaction from the list view.
-
In the Transaction record, select the Adjustment tab.
-
In the 'Adjustment Mode' field, select 'Approve.'
-
Select the 'Begin Adjustment' button.
-
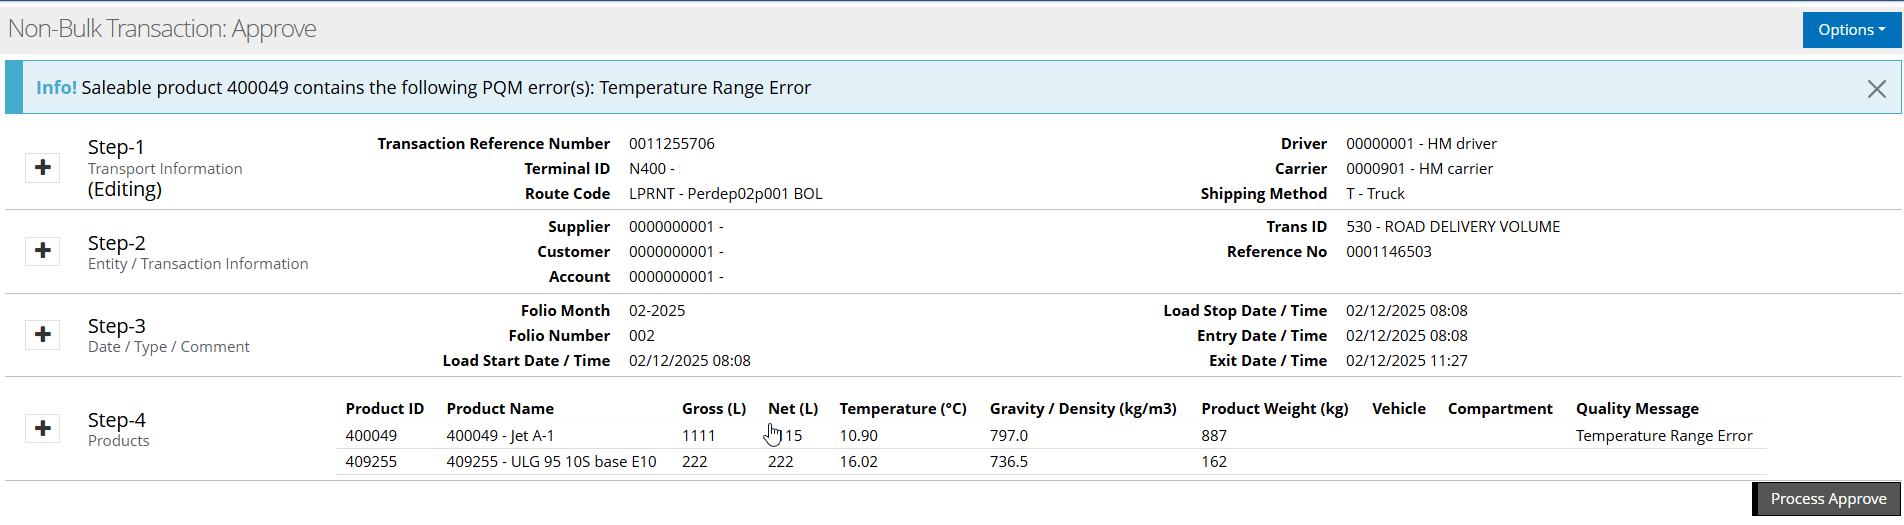
At the top of the screen will be a notification banner alerting you to what field is related to the PQM error. Since you are not making any changes to the data, you can select 'Process Approve.'
-
You will receive a Transaction Summary modal screen displaying the Total Net Quantity of product processed. Press 'OK.'

-
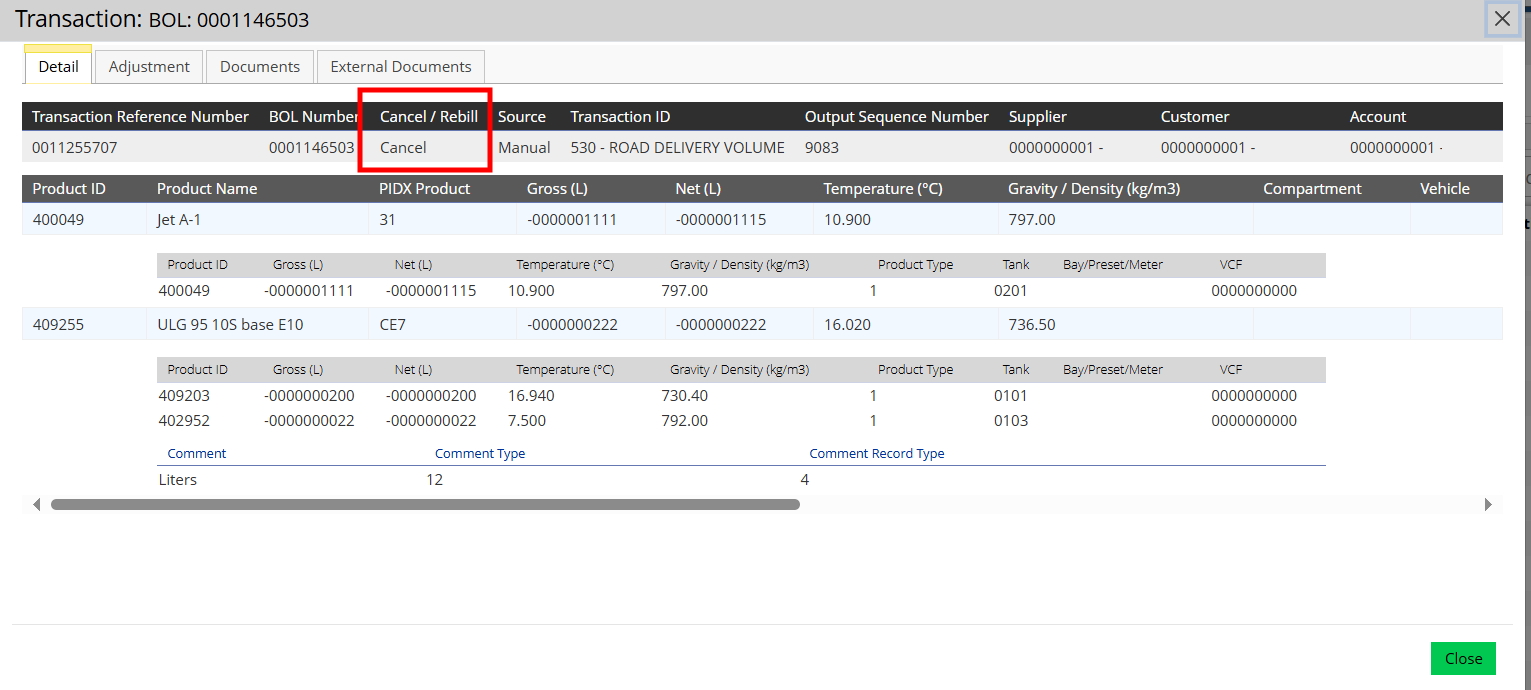
TMS will then process the Cancel/Rebill and you will have three transactions: the original, a cancel transaction, and a rebill transaction:

Cancel Transaction:
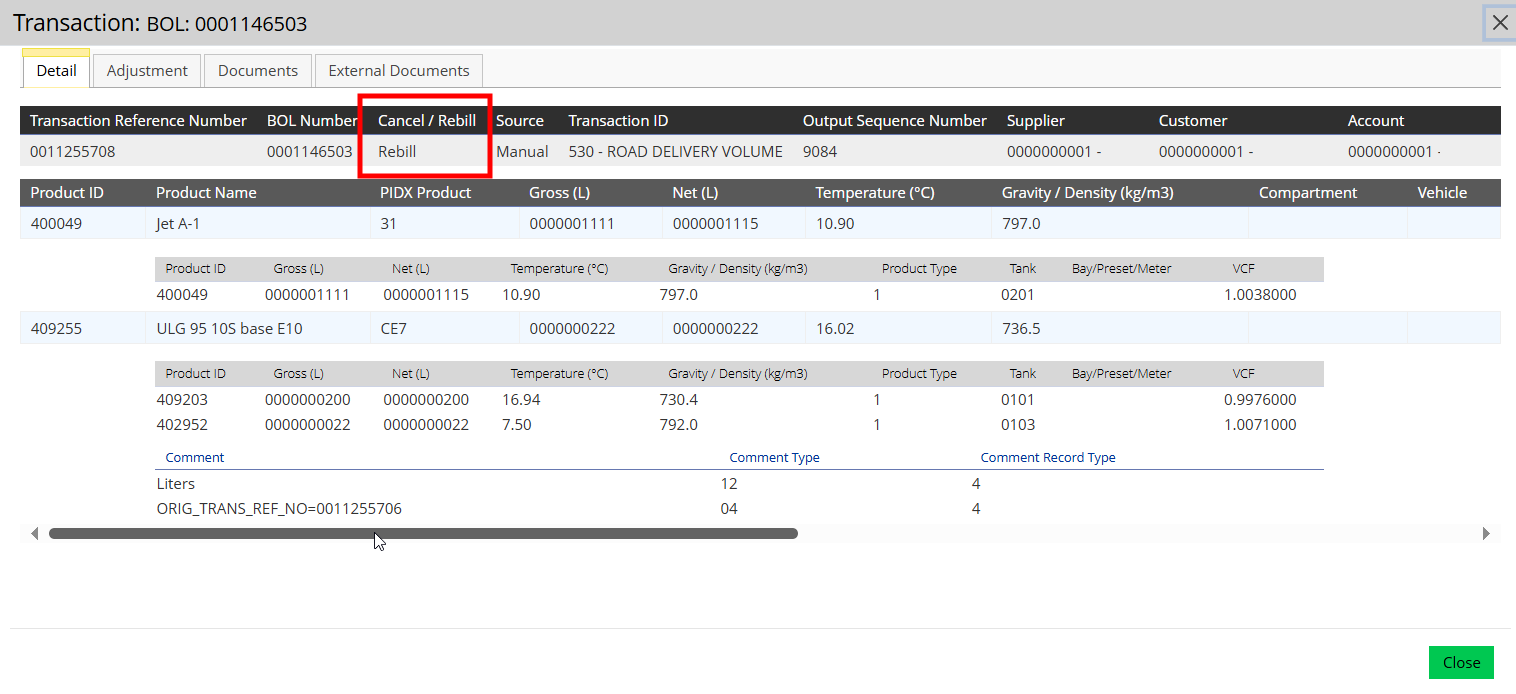
Rebill transaction:
Adjust
The Adjust option allows you to adjust or correct the PQM error (one of the issues related to the Product Quality ranges defined using the Product Quality screen). Note that the Adjust option performs a Cancel/Rebill for all products in the original transaction and not just the products with PQM errors. To adjust/correct a PQM error, complete the following:
-
Select the desired transaction from the PQM Transaction Correction screen.
-
In the Transaction record, select the Adjustment tab.
-
In the 'Adjustment Mode' field, select 'Adjust.'
-
Select the 'Begin Adjustment' button.
-
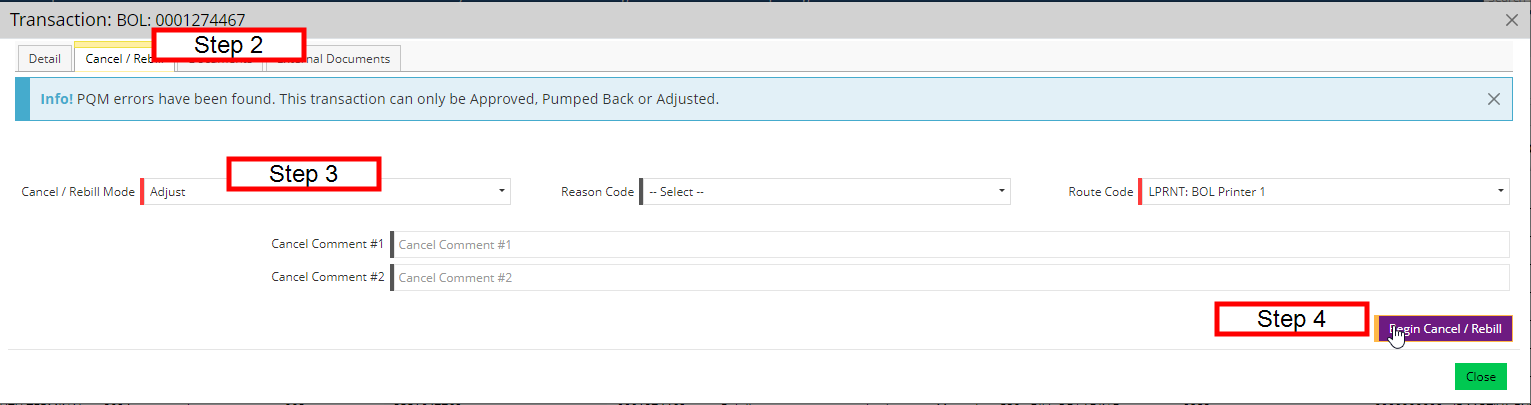
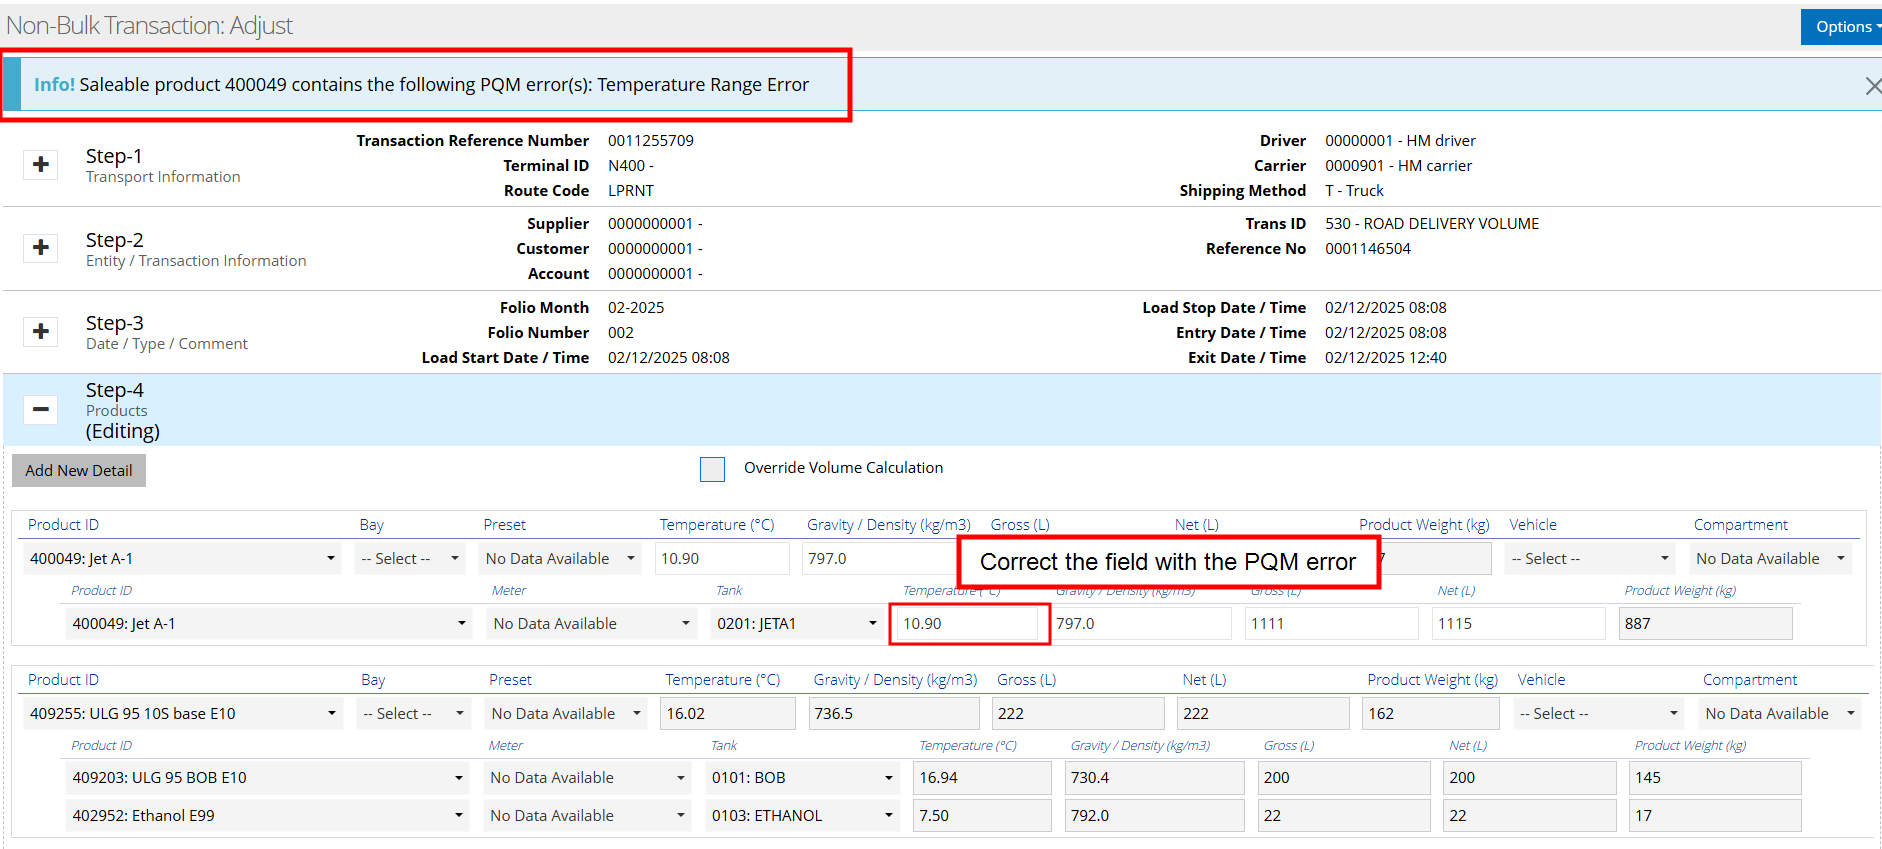
After selecting 'Begin Adjustment,' the Non-Bulk Transaction: Adjust screen will open. At the top of the screen will be a notification banner alerting you to what field is related to the PQM error.
-
Adjust the transaction details specified by the PQM error notification to correct the transaction. The only fields that can be adjusted are Temperature, Gravity, Gross, and Net fields. All other fields are read-only.
-
After confirming all changes are correct, select 'Process Adjust.'
-
You will receive a Transaction Summary modal screen displaying the Total Net Quantity of product processed. Press 'OK.'
-
TMS will then process the Cancel/Rebill transaction which will appear in the Transaction Viewer.
-
Adjusted Cancel transaction:
-
Adjusted Rebill transaction:

Pump Back
The standard functionality of the Pump Back option is that TMS will cancel the entire transaction and then rebill any good products (products with no PQM errors). In the event that there are no applicable products/batches to be processed, only a cancel will occur. Note that similar to the 'Approve' option, you cannot adjust any values as part of the Pump Back process.
When using the Pump Back option, the transactions will be processed using the PQM Transaction Correction -
Pump Back screen (WORKFLOW-215) instead of the Bulk/Non-Bulk transaction screens; however, the layout of this screen matches the other manual transaction screens.
To process a Pump Back on a PQM Error transaction, complete the following:
-
Select the desired transaction from the PQM Transaction Correction screen.
-
In the Transaction record, select the Adjustment tab.
-
In the 'Adjustment Mode' field, select 'Pump Back.'
-
Select the 'Begin Adjustment' button.
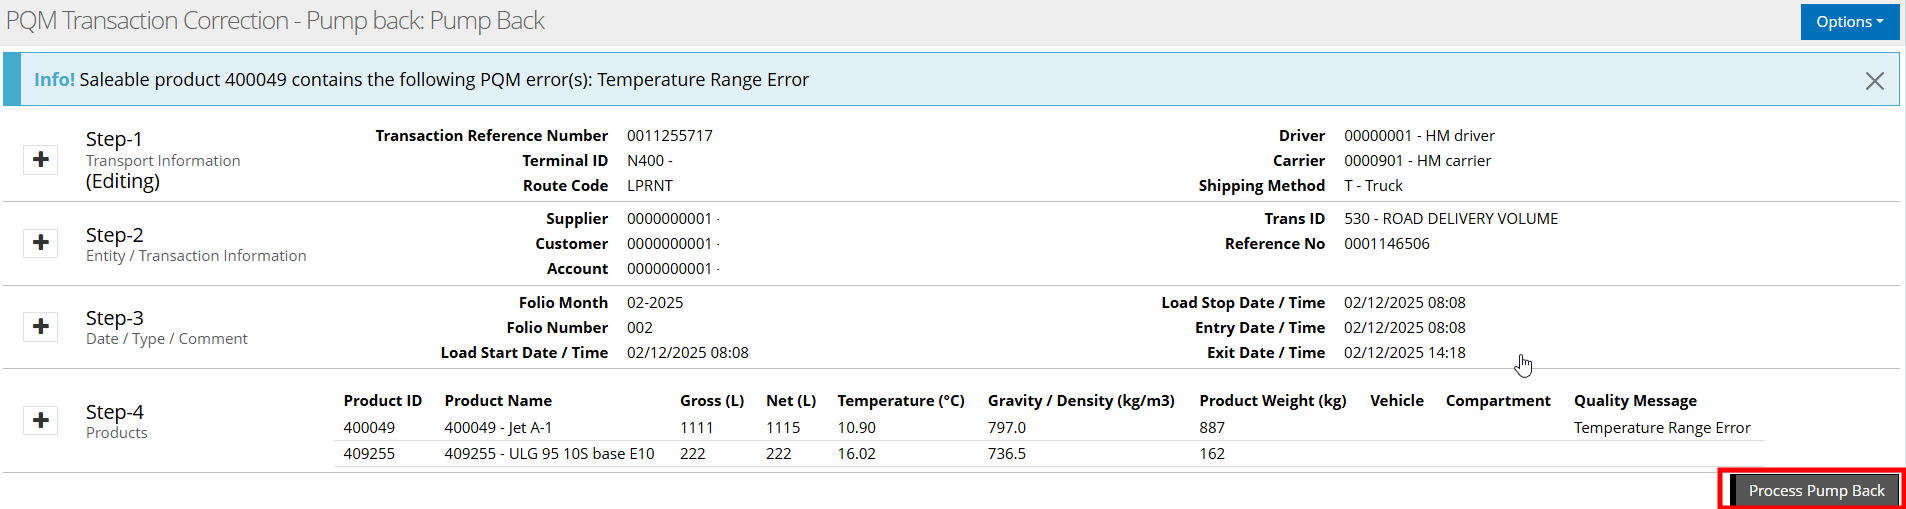
-
At the top of the screen will be a notification banner alerting you to what field is related to the PQM error. Since you are not adjusting any values in a standard Pump Back, you can select 'Process Pump Back.'
-
You will receive a Transaction Summary modal screen displaying the Total Net Quantity of product processed. Press 'OK.'

-
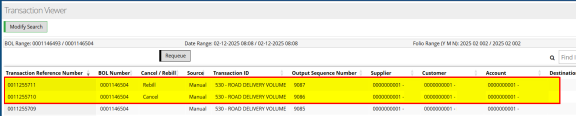
Cancel/Rebill (or in some cases, just a Cancel) transactions will now appear in the Transaction Viewer.

Pump Back (Transmix Version)
Users also have the option to use the Transmix functionality with the Pump Back process for PQM Transaction
Error Corrections. When this feature is enabled, the Pump Back will allow you to process the Pump Back to a
new Transmix Tank. When this occurs, several Cancel/Rebill transactions are generated:
-
A Cancel transaction for the entire original transaction.
-
A Rebill transaction for all good products/batches with no PQM errors in the original transaction.
-
A Rebill transaction into the new Tank for the PQM error products/batches.
-
A Rebill transaction of the PQM error products are rebilled with the inverse transaction code (original receipts become disposals and vice versa)
To process a Pump Back using the Transmix functionality, complete the following:
-
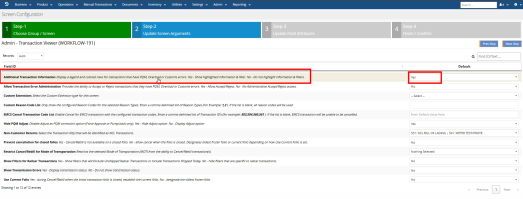
To enable the Transmix feature, the screen argument must be enabled for the PQM Transaction Correction - Pump Back screen (WORKFLOW-215) using the Screen Configuration workflow screen.
-
Navigate to Screen Configuration (WORKFLOW-002).
-
Search for PQM Transaction Correction - Pump Back in Step-1: Choose Group/Screen.
-
In Step-2: Update Screen Arguments, set 'Enable Transmix Pumpback' to 'Yes.'

-
Confirm the changes in Step-4: Finish/Confirm.
-
-
After enabling the screen argument, navigate to the PQM Transaction Correction screen.
-
Search for the desired transaction and select it.
-
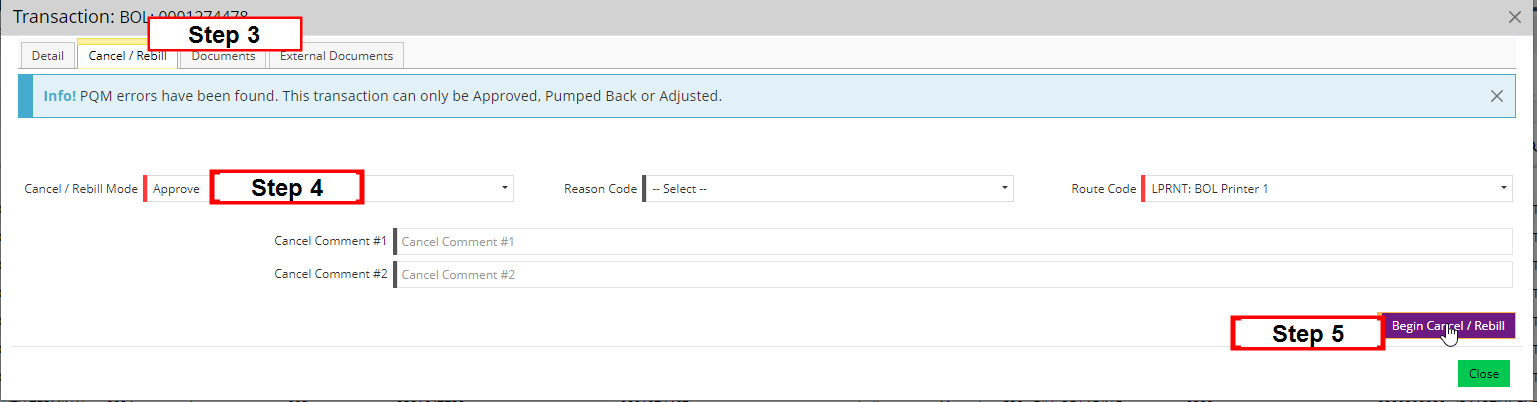
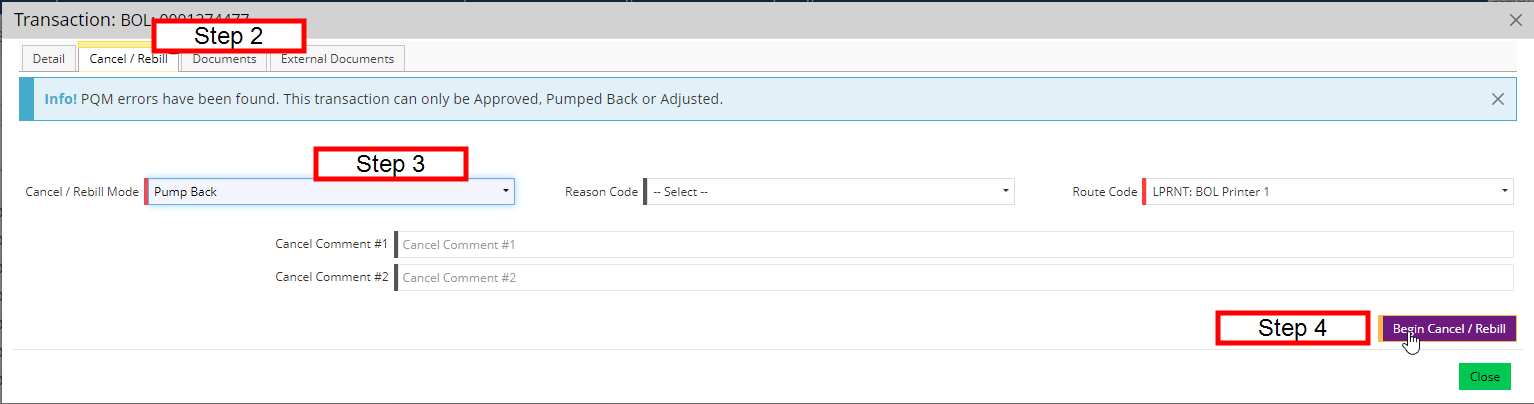
In the Transaction record, select the Cancel/Rebill tab.
-
In the 'Cancel/Rebill Mode' field, select 'Pump Back.'
-
Select the 'Begin Cancel/Rebill' button.
-
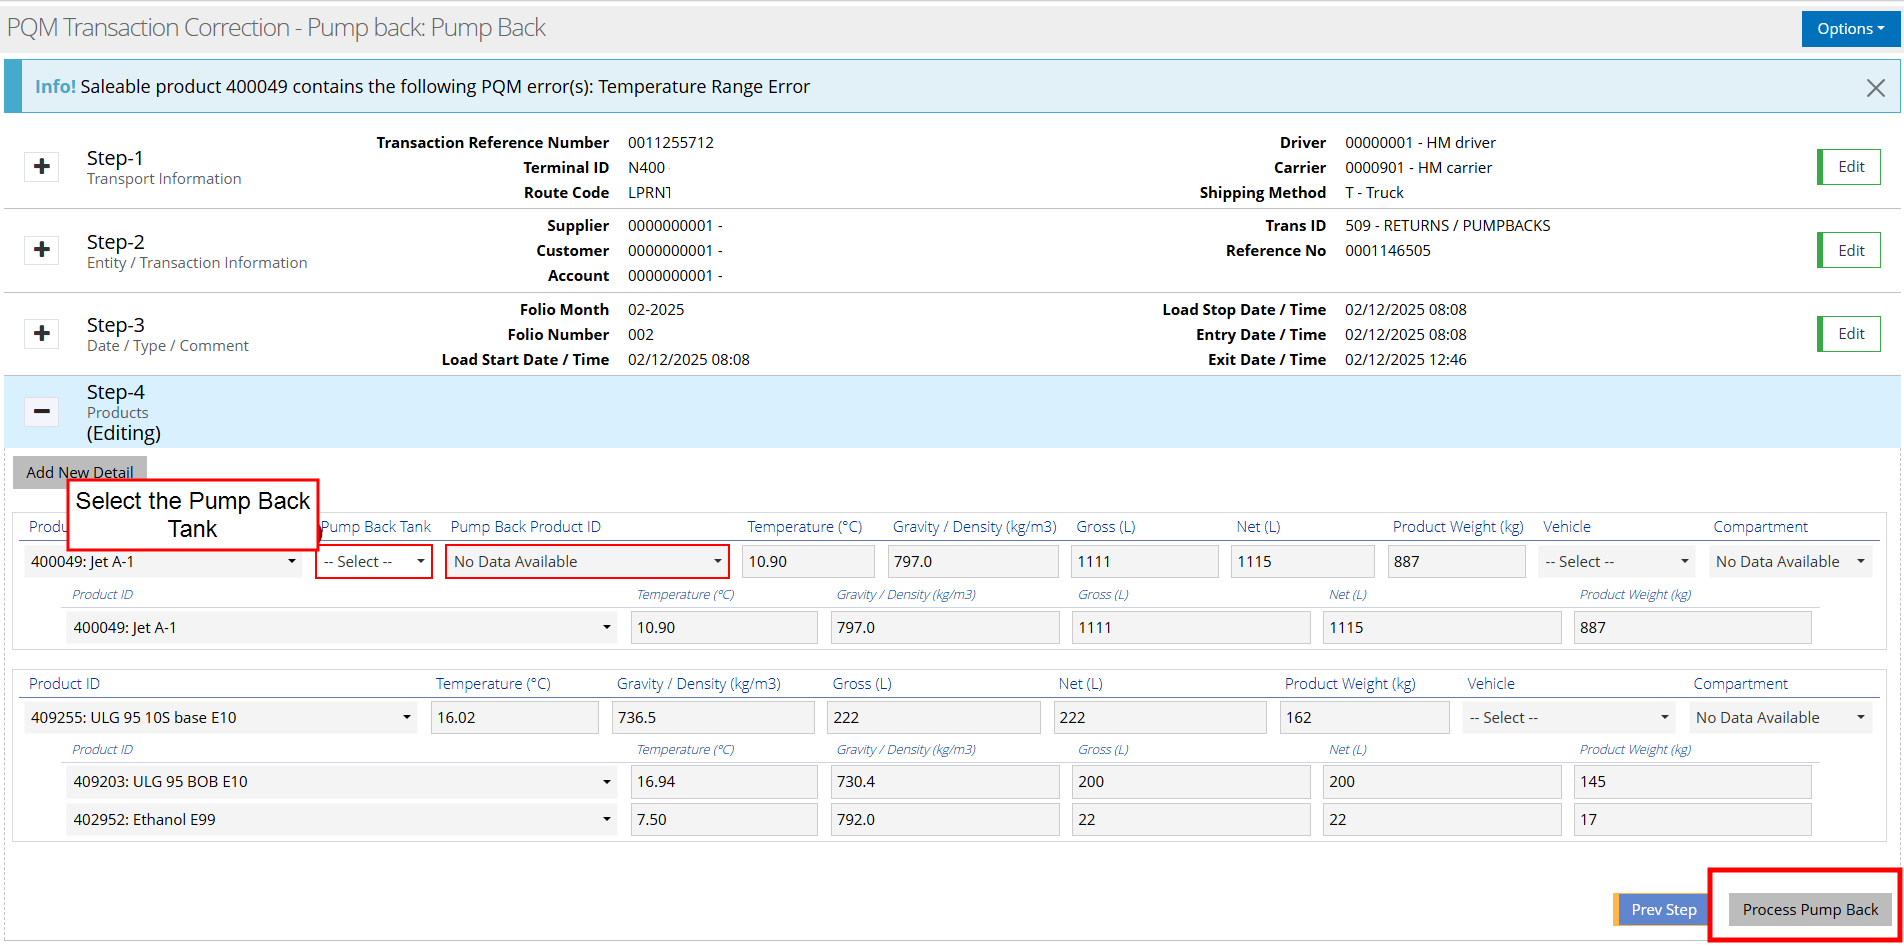
Now that the Transmix flag has been enabled, you can select a 'Pump Back Tank' in Step-4 for the product with a PQM error. Note that the 'Process Pump Back' button will be disabled until a tank is selected.
-
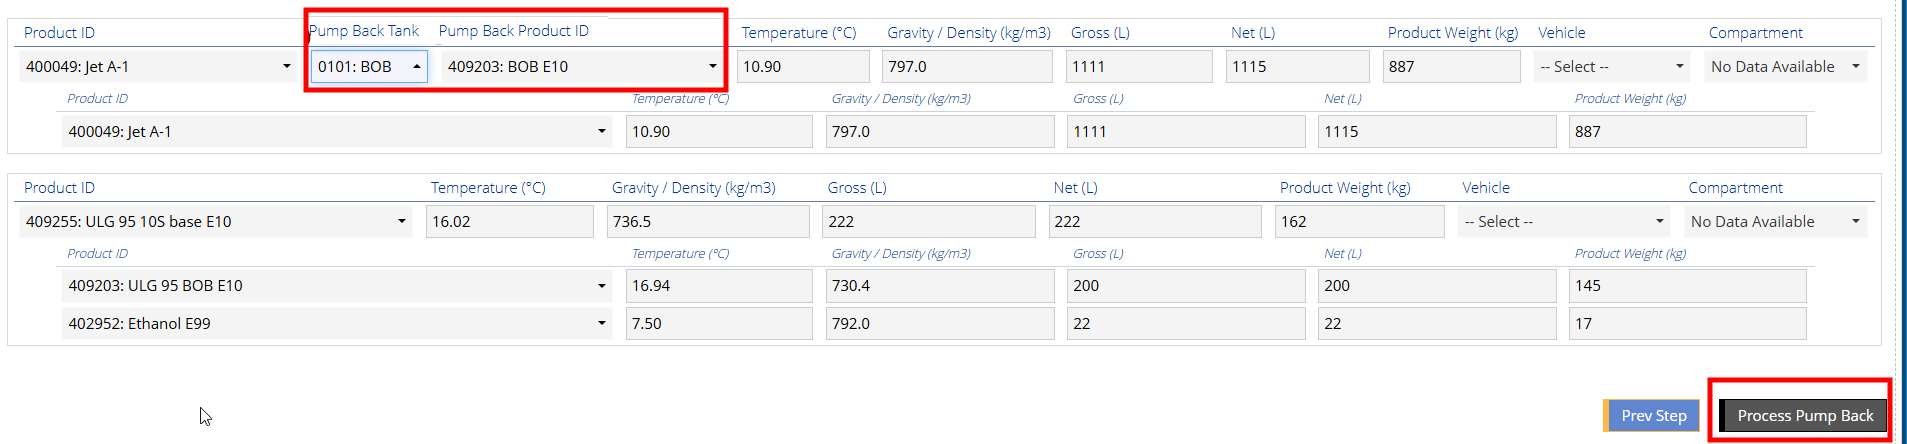
After selecting the Tank, the Pump Back Product ID will be updated to reflect the new Product ID for the Pump Back for the erroneous PQM product from the original transaction. Note that the 'Process Pump Back' button is now enabled.
-
Select 'Process Pump Back.'
-
You will receive a Transaction Summary modal screen displaying the Total Net Quantity of product processed. Press 'OK.'
-
The Transaction Viewer will now show multiple transactions which will be described below:
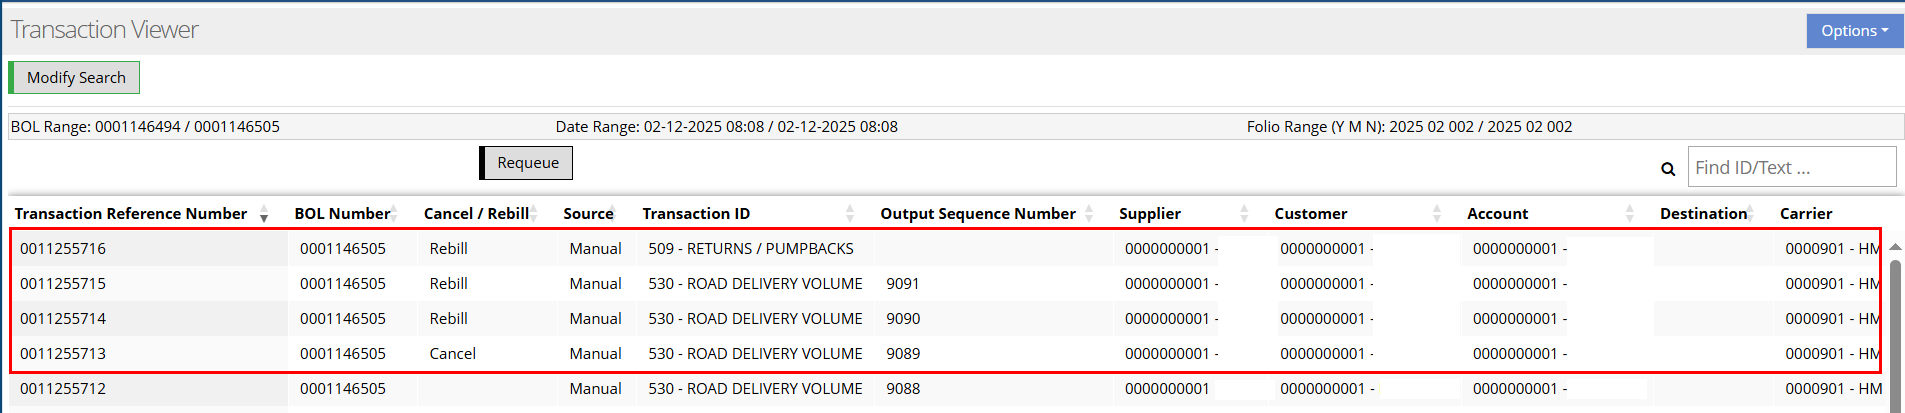
-
Several transactions will be created:
-
A Cancel transaction for the original transaction.
-
A Rebill of products that did not have any PQM errors.
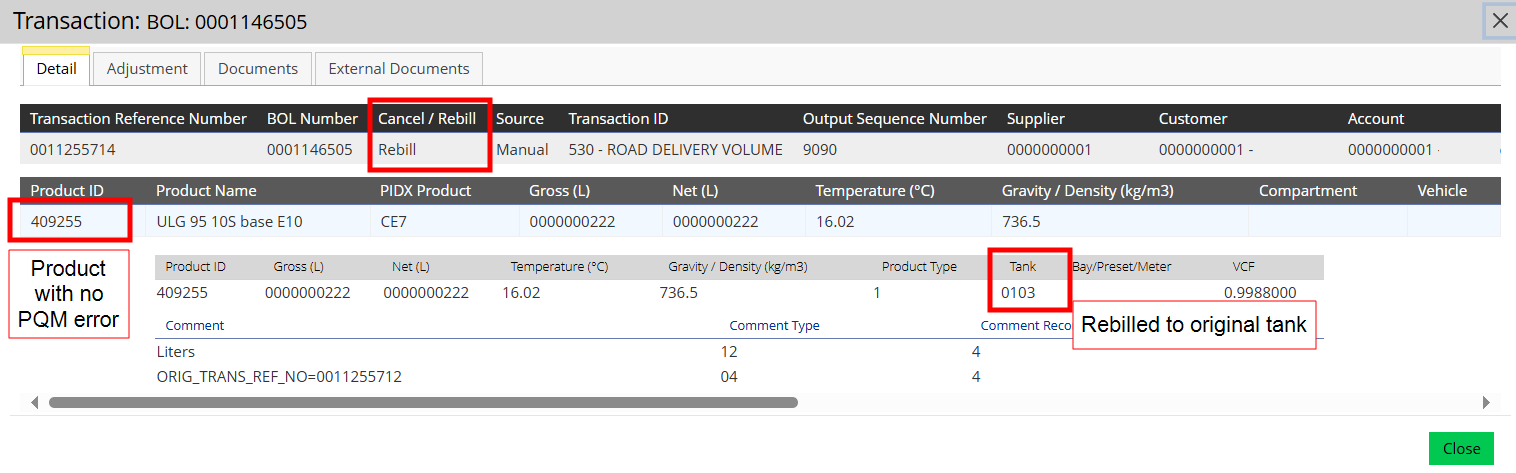
-
A Rebill of PQM error products into the new Tank.
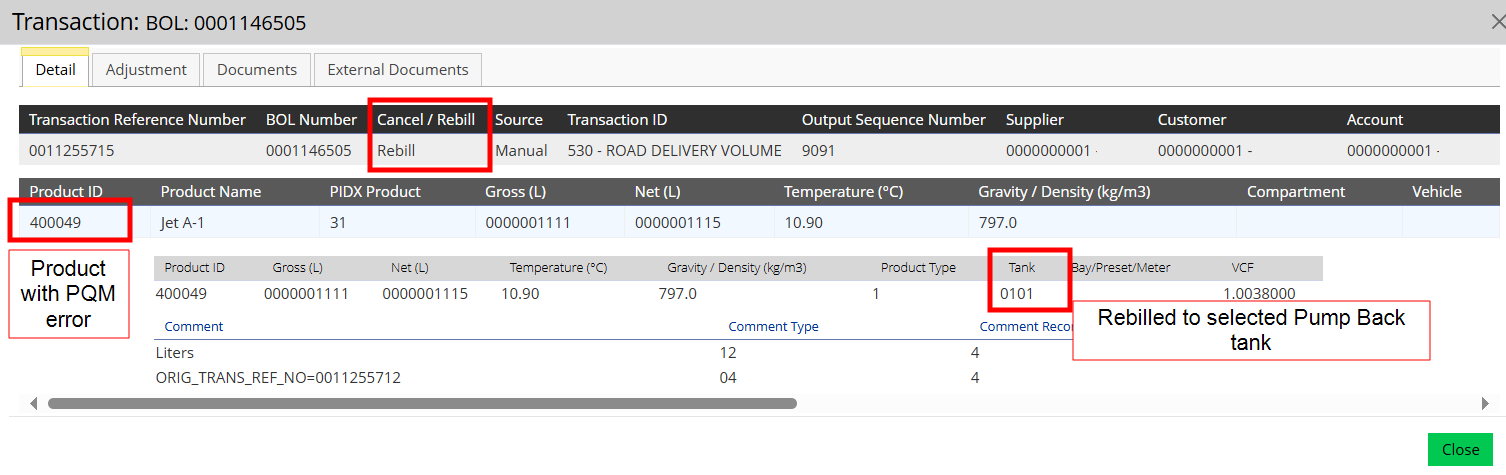
-
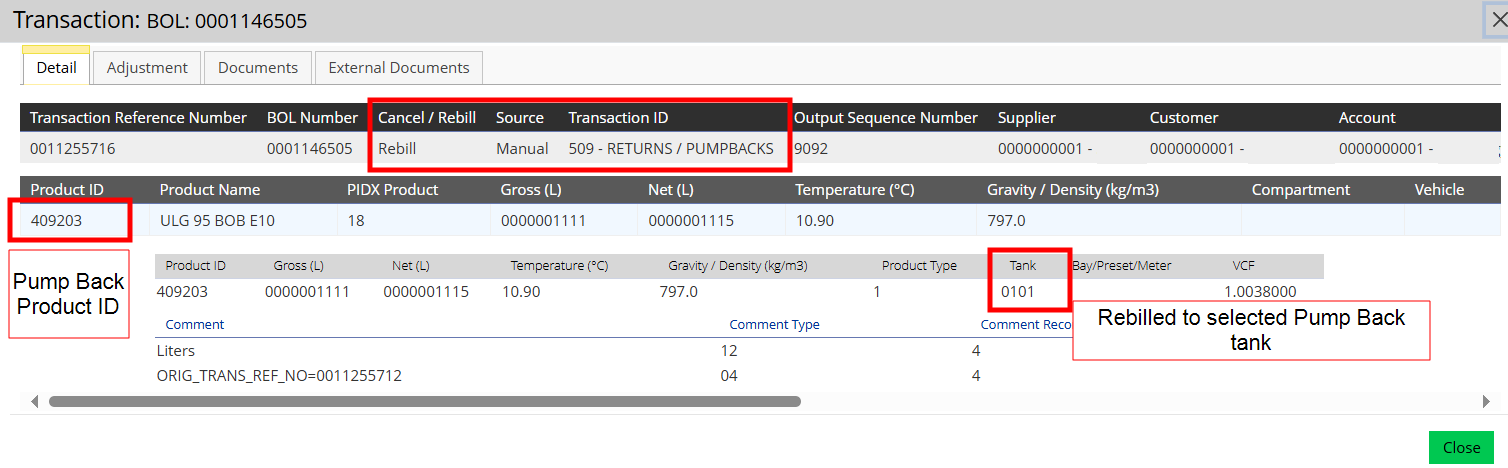
A Rebill reflecting the new Pump Back Product ID and Tank. Note that the Rebill for this Transmix Tank will have the opposite trans_id sign [609(-)/Disposal or 509(+)/ Returns/Pump Backs]
-
NCL Returns
Non-Customer Loads (NCL) from a loading rack refer to fuel or other bulk liquid product deliveries that are not directly tied to a customer order. These could include internal transfers, maintenance-related withdrawals, quality control samples, meter proving, or emergency fuel distributions.
The Transaction Viewer allows users to process NCL Returns.
Required Screen Arguments and Configurations
Groups
In order for an operator to use the NCL Returns workflow screen, they must have permissions configured. You can configure group permissions using the Groups (WORKFLOW-094) screen and searching for NCL Returns:

Transaction Viewer (WORKFLOW-191)
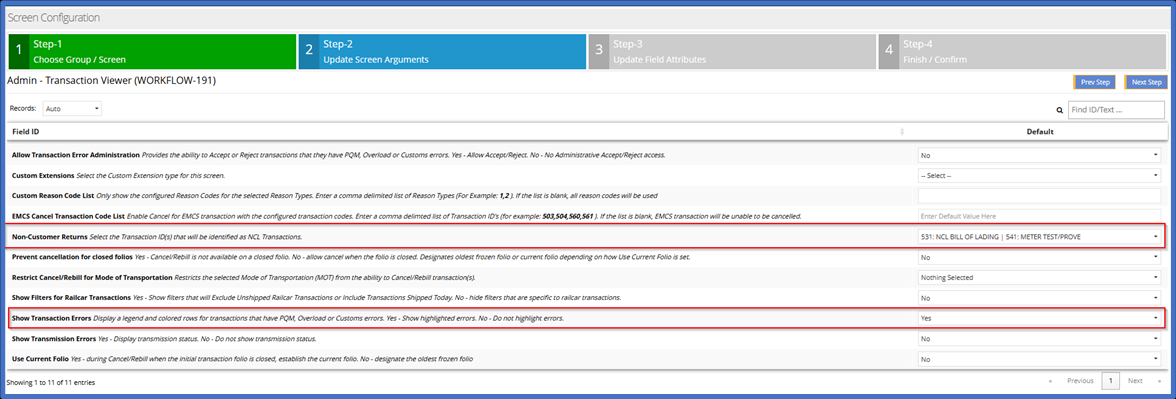
The following screen arguments should be enabled via Screen Configuration for the Transaction Viewer:
-
Non-Customer Returns: Select the transaction IDs from the dropdown menu that TMS will identify as NCL transactions. This is a multiselect field, so you can choose multiple transaction IDs.
-
Show Transaction Errors: Set this argument to ‘Yes.’ When this argument is enabled, the Transaction Viewer will be displayed with colored rows and a legend that indicates PQM, Overload, Communication Errors, and NCL transactions.
Transaction Viewer
The Transaction Viewer is the main screen that will be used to identify NCL transactions and trigger the NCL Return process. A new Show Only filter has been added to the Transaction Viewer search criteria that allows you to filter transactions for only NCL Returns.
![]()
After filtering to show only NCL transactions, the Transaction Viewer will list all NCL transactions. These transactions are color coded and correspond to the legend visible above the table (the legend and color-coding are enabled via the ‘Show Transaction Errors’ screen argument).

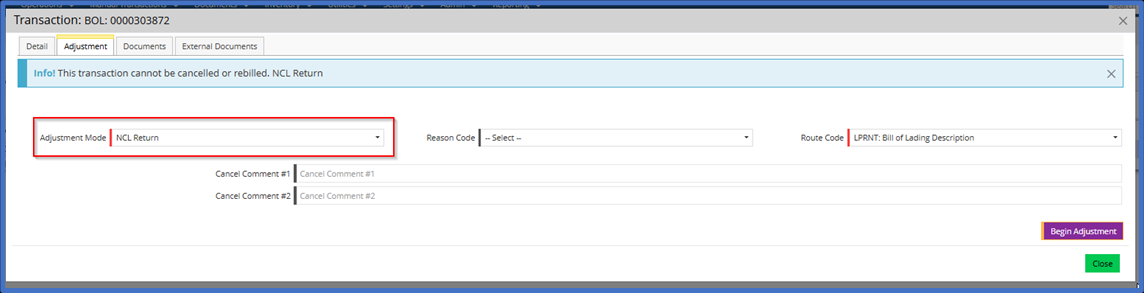
A user can then select the NCL transaction to begin the adjustment process. After selecting the transaction and selecting the ‘Adjustment Tab,’ the user can select ‘NCL Return’ from the ‘Adjustment Mode’ field and click ‘Begin Adjustment.’ Note that there is a notification banner that appears alerting the user that the transaction can only be processed as an NCL Return, not cancelled or rebilled.
There are a few different ways that NCL Returns will be processed depending on the product(s) and tank(s). The following subsections will provide examples of each of these potential return scenarios.
Default/Simple Return (transaction ID 509)
A simple return is when the original product is being returned to a different tank (and non-COC tank). After selecting the transaction from the Transaction Viewer and configuring the adjustment mode to ‘NCL Return,’ complete the following:
-
Click ‘Begin Adjustment.’
-
The NCL Return workflow will open. The screen will open to Step-4: Products.
-
The only field that can be edited in an NCL Return is the ‘Return Tank’ field. This field indicates the target tank the product will be sent to. The ‘Return Product’ field will populate with the product associated with the selected ‘Return Tank’ (the tank must have an active product configured). In a simple return, the product in the NCL transaction will match the return product.


-
After choosing the ‘Return Tank,’ click ‘Process NCL Return.’
-
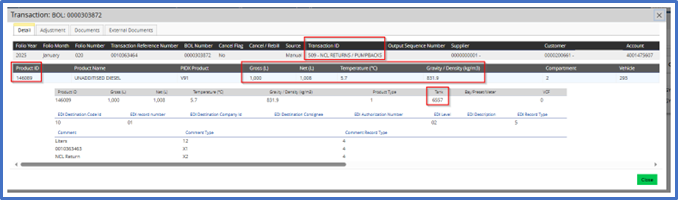
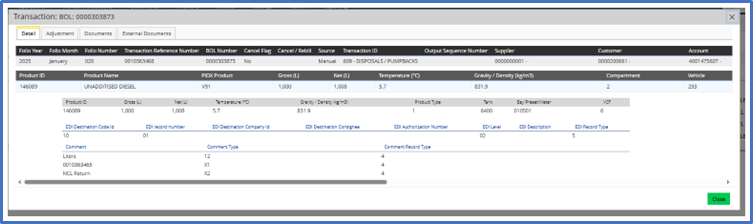
In the Transaction Viewer, the original transaction will be shown as cancelled and a new return transaction (trans ID 509) will be created.

-
The user can then verify that the return was processed with the product, tank, gross, net, weight, temperature, and gravity/density values from the original transaction.
Rebrand (transaction IDs 717/718/609)
A rebrand will occur when a product in an NCL return is sent to a target tank that has a different return product.

To process an NCL Return as a rebrand, you would complete the same steps as a simple return, but the generated transactions will be different. The original 531 transaction will be cancelled, and three new transactions will be generated:

A user can verify each of these new transactions to ensure the NCL return was processed with the product (except the 717 transaction, which will be the ‘Return Product’), tank, gross, net, weight, temperature, and gravity/density values from the original transaction.
609 transaction:
717 transaction:

718 transaction:
Return using a COC Tank
Side Streams
Multi-Products
PQM Error with NCL Returns
Required Screen Arguments
Pump Back
NCL Returns
Overload Errors
Required Screen Arguments
Communication Errors
Required Screen Arguments